Thursday, 25 September 2014

Creative Expressions Thursday.

Hi my lovely blog family and friends.

Well thank you so much all for the lovely comments from yesterday , I am so pleased you all really enjoyed my little canvas. I am going to do a large size one I think and it will be part of my 200 people subscribing so look out for that won't you all ad you will get to have a bit of artwork from little ole me on your wall to keeps and look at and even chat to if you want to haha.

Right without further Ado as they say back to today's project using Our lovely Sues stamps and dies from the stamps to dies for range and of course Sue's own die ranges The festive collection and the Californian collection.

See what you think.

 This one I decided on some real classic colours in our soft gold card, milk  black and red, I used Ivory embossing on the Christmas night Bauble and Bright gold embossing on the sentiment "seasons greetings" from the Snowflake bauble set.

 I just love the Santa going over the moon inside the Bauble, how cute is that and very clever.
Ok so I started with some soft gold card stock and I rounded off the edges and took the largest die from the Californian collection - Decorative frames and cut out an aperture, I saved the inside mat to go on another card maybe for next week who knows , but as another idea it is the perfect shape for a label on its side to go round a bottle and write something special on it to a loved one or have a candle in the top of the bottle with the hot wax dripping down the label making patterns etc, (romantic old fool tonight aren't I)haha.
I then added foam to the back and built it up a little so it stood just a tiny bit away from the card underneath, I chose red to go with the traditional Christmas gold and laid the gold piece on top just so I could see to stamp onto the red card with Perfect medium and emboss it with Ivory powder which suited it very well I thought.
I then mounted the red card onto white and stamped my sentiment on the bottom and embossed in gold powder. I of course matted that onto black before adding foam and raising this layer onto foam again and adding that on top of a pierced layer which has a tiny tiny mat of red under, so more foam and the last mat which is milk white again with a soft gold mat to set off the main colour on the front of the card.
 I did add a tiny piece of Ivory satin edge organza ribbon to two corners of the soft gold piece of card on the very front and then tied a pretty double bow, adding one of the small self adhesive snowflakes in pearl to the centre.
 I then stamped out several of the Pinstriped Poinsettia stamps in a cranberry colour and added some gold gel pen to the ends of the petals and gave them all a shimmery finish with a really classy shimmer without the too flashy with glitter on this occasion. I then used a foam mat to help shape the petals and glued them together .I made 3 different sizes and also some leaves and added them to the bottom left hand side.
I added a few pearls in the corner and some more of those gorgeous snowflakes too and there it is finished apart from I am going to draw in a chain holding the bauble up I think and add some sparkly highlights to catch the light too.
 Here are the two stamps I used and of course the little sentiment was from yet another set as I mentioned earlier.
And here are the two dies also , what versatility you have with just this four items alone but of course Sue has made so many gorgeous dies which you can mix and match with the gorgeous festive stamps too, or any other stamp come to think of it haha.
                            
Have any of you lovely blogglies started your Christmas cards yet ? I never do them til the last minute but as this was for the DT piece I at least got a little practise in .

I've have had a couple of requests to put up the dates of the next shows and as you
know they can sometimes be cancelled and changed around by Ideal world but as it stands I have a couple of shows on the 8th of October and again on the 20th October. So I am starting the prep now for the first one and really enjoying getting it all together for you to see.

I hope you like this one and if you feel like popping over to the Creative expressions blog to leave me a comment on there too I would be really grateful, or on facebook of course if you have me added.

Have a lovely Thursday and I will see you soon.

Love
Kim 
XXXX

Wednesday, 24 September 2014

Visible Image Wednesday

Hi Everyone

Hope you are all well, I am missing all the ladies that went off on holiday this week but I hope you all have a wonderful time. I wish I was firmly tucked in your hmm very large suitcase, a small one just wont do. lol
Well I had a wonderful time popping to the Aly Paly show this weekend , I got to meet lots of lovely ladies from here and Facebook, twitter etc and saw lots of lovely goodies and team members I also got to have lots of hugs with the wonderful Helen and Mark , Mr and Mrs Visible Image themselves. We didn't have a lot of time to chat but it was so good to see them as it had been over a year since we last met.
I got given lots of new gorgeous stamps to create with so today I decided I would do a canvas as the first piece I created for Visible Image back for the very first post was a canvas which is still displayed and I love it so I hope this is loved as much as I do.

So here we go my Finnabar inspired 6x6 canvas with Visible Image gorgeous INKognito stamps.

 This is so easy to put together but its one of those that looks more complicated than it is.
To start I got a tissue and separated the plys so you just have one layer and I stamped the Woman INKognito stamp onto it with Versamark pigmant ink and heat set it a little to help it set.
I prepped my canvas with a layer of gesso and dried it with a heat gun.
Next I coated the area on the left of the canvas with some PVA glue mixed with a little water and tore around the woman image and added that to the canvas, I added more glue on top of the image and sealed the edges well.
I then added several more smaller pieces of tissue in single ply in different area on the canvas and on the sides to add some texture and wrinkle it with the glue mix as I went.
I also stamped out my "Imperfection is Beauty" sentiment on white card again in Black pigment ink and then mounted it on to a very thin black mat and set aside.

 I laid it back slightly because the camera really isn't picking up the sparkle , its showing it as quite a flat image but it isn't at all, I have also added some really blingy pieces at the very end also and they have amazing shine that does not show much at all, hey ho.

Anyway back to how I made it.

I really wanted to add a frame around the lady but It really detracted from the beautiful hair splashes so I decided to add more texture to the canvas instead so I took a stencil and some Dreamweaver crackle paste and added some tiny dots, big dots, stripes and splashes all from the one stencil which had 5 sections of small areas of pattern to choose from ( I mostly covered it with flowers etc but it is there under the edges ). Then I lathered it around the sides with a spatula and had it thick in some areas and thin in others and dried it all to crack it.
I chose lots of wooden buttons in all sizes and some wings and lots of different size flowers in any colours cos we will paint them so any old colours will do and then once worked out where all would be placed roughly I went ahead and added the sentiment on foam at the bottom so I knew where I could add everything up to.


I gave the woman a little necklace from pearl strings and this close up here shows the wonderful sentiment and you can see the flowers and bling items a little better here, If you look at the texture on the frame you can also see I added glue in random areas and sprinkled some very fine Micro beads to them.
I also added butterflies in wood and a dragonfly, a heart and few other bits.
At this stage I took a white paint and started to paint over everything accept the Main image and the sentiment which I wanted kept clean.
Once everything was covered, even the metal on the corners and wings. I took two Vintage sprays in a brown and a blue tone with no Mica and sprayed lightly in areas but kept a tissue in my hand to dab the colour to the sides too , rather than get drips running down. Sometimes I want that look but others I want it more controlled like this one.
Once this layer was dry and the sprays had seeped into the cracks and patterns on the canvas I think this is when you really notice them and can see where it needs other things. So I took some gilding wax and rubbed it onto all the textured areas and edges of flowers etc and all them little beads lol.
The last thing was to add the bling cos you don't want it to get spoiled with paint and sprays so I had these little circles that fitted some of the flowers perfectly and left another layer showing so I added them to about five and left the rest bare. No need to over do it.
Voila... all done, quick and simple , this actually took me less time than a card.

 I snapped this shot at the top of the canvas so you can see the slight sparkle on the canvas and the bling piece sparkling too. The sparkle I used a gel pen right at the very end to add a few glittery bits and a water brush to brush a little of the sparkle out further.

 I held it up against my cream wall with both my small lamps shining on it, You will just have to wait til my you tube videos start folks and hopefully you can see them the sparkle better . I absolutely love love love these arty stamps and really enjoyed creating this for Helen and Mark so I hope they like it.

The stamps I used for this one were.

                             Woman INKognito                                Imperfection is Beauty.

So there we have today's piece which I hope you like and will have a go at, You can do this on any size canvas but I recommend starting fairly small if you have never used this technique as you don't have a huge area to try to cover and stick to a few pieces but lots of them rather than 100's of random bits of everything unless you like that look of course, no rules in craft just taste. (whoop that should be a stamp don't you think haha?)

Ok it is now quarter to three a.m and Im getting daffy so I hope you enjoyed, don't forget to subscribe and add me to your facebook, twitter and I also have pinterest so follow me if you would like to and all that fun stuff, don't forget we are nearly at 200 subscribers so we will have a nice giveaway once we get there so keep telling your buddies if you can.

Have a wonderful Wednesday

Hugs

Kim 
XXXX


Thursday, 18 September 2014

Creative Expressions Thursday.

Hi to everyone

I hope you are having a good week, can you believe we have made it to Thursday again already, I sometimes have no idea where time goes some weeks.
 I have been busy with gorgeous paints,waxes and inks. I also popped up to see everyone at Creative Expressions to drop off some goodies (coming soon) and plan my next shows for you to enjoy. So far if all stays the same I am on your screens next on the 8th and 20th of October which I am looking forward to very much.
I just love reading through all your emails , I do wish they would let us have them though so I could answer you all. I feel it is important for you all to know how much your kind words mean to me.
Everyone was soooo manic up at the head office yesterday getting ready for Aly Paly this weekend packing up soo much gear ready for the lorries to come collect , ooo exiting , I really wish I was demoing though but hopefully next time. least I will be there both days to chat to everyone that comes along.

Ok so back to today's gorgeous sparkle fest.... Of course this months Dt package is Xmas stamps to die for and some of our lovely Sue Wilson's new dies and I mixed in a couple of dies from Sue's original Californian collection as I simple just love them so here is todays card.

So what do you think?

I wish you could see just how sparkly and pretty this is to the naked eye. 
To start this one I pulled out the card I knew I wanted to include which was our Foundations card stock in Coconut white, black, soft gold and red. Very classic Christmas colours with a little Vintage edge to it                                                                                                                                       .
I stamped out my Elegant poinsettias in Red pepper Adirondack dye ink pad ( on reflection I wish this red was a bit brighter as on camera it does come over a little orangy) I also used some Sap green Archival for the leaves I then cut them out with the corresponding die - The classic Poinsettia Die in Sue's Christmas collection of dies.
I then chose from The Californian collection's, Background die and cut a backing piece. I wanted to create a little illusion for this so adhered it onto a piece of double sided adhesive and attached a piece of red card to the back and sprinkled the gaps with diamond sprinkles at the front I cut it flush with the backing piece and then mounted that onto black card with just a tiny border showing.
                                                                            
Next I created the glitter layer which is simply red card with diamond sprinkles added and then mounted onto black again with the small border.
Here I went into matting and layering over drive but seeing it is for Christmas I thought why not haha. Several layers and a double mat of white with a pierced edge to finish the base.
 A long view of the layers at the side .

                                                                                                                                                                                                                    
I also put together a few layers of the poinsettia with a tiny bling for the centre, the petals were curled around my pokey took and a darker red ink was added to the edges all round, plus three leaves added, I always think  that leaves or petals or even flowers look better in odd numbers, rather than even so always stick to 3 or 5 etc etc, nature does not grow in an even way.
So all that's left now is the focal point  so I cut The Beverly hill die again from the Californian collection of Sue's dies a red piece and a coconut white piece , the red was added to the card horizontally and the white on foam vertically. In the centre of that I cut a black and white piece of the smaller element from the die which is simply stunning I layered the white onto the black with just a tiny shadow just as Sue has shown you all on C&C .
Lastly I added some bling around the card edges and tied a red seam binding bow for my central piece and adhered it in place with a sparkly embellishment from the CE line. 
I wanted to show you two Photos to show the difference with a bow that doesn't have glue dots 
arranging it neatly and one that is just as it comes to highlight why I say "glue dots are your friend" lol. 
Photo one is as it comes and looks pretty.
And now the same photo that I showed at the beginning once glue dots have been used to arrange the bow and tails. Card dimensions finished at 61/2 " by 7 3/4".
                                      
It just makes it look more professional and groomed. Can you see what a difference it makes just a few tiny glue dots added invisibly to the very last part of the seam binding.

The dies and stamps I used are as follows.


Stamps to die for Elegant Poinsettia and Classic Poinsettia die and also The background die and Beverly hills die set from the Californian collection of dies.

I hope you like this one it certainly took a bit longer to put together because of all the different layers and also to describe all the layers haha.

Have a lovely Thursday , please don't forget to pop over to the Creative expressions website and leave me some love on my today's post if you have a chance. Click Here and it will take you straight there.

Anyone going to Aly paly please say hi if you see me as I love a good chat , especially over a cuppa haha. If not we will meet at another show soon I hope.

Huge hugs

love
Kim 
XXXX

Wednesday, 17 September 2014

Visible Image Wednesday

Hello my lovely folks

I hope you are all doing ok this Wednesday, today I have my first post for Visible Image and the lovely Helen and Mark since all the hospital trips began. I would like to take this opportunity to thank them from the bottom of their heart for all the patience and support Helen has given me not only as co owner of Visible Image but as my friend too. Helen you are a lovely kind lady and I am proud to call you my friend , I really have appreciated your kind words and you are very special to me.

Also I want to thank all the wonderful Internet family  ( that's all you lovelies) who leave me such wonderful kind  whole hearted messages everyday , I wish I lived near each one of you so I could pop in with treats as I am so pleased you are all on my blog as part of the family. Huge hugs of appreciate from my house to yours ladies.

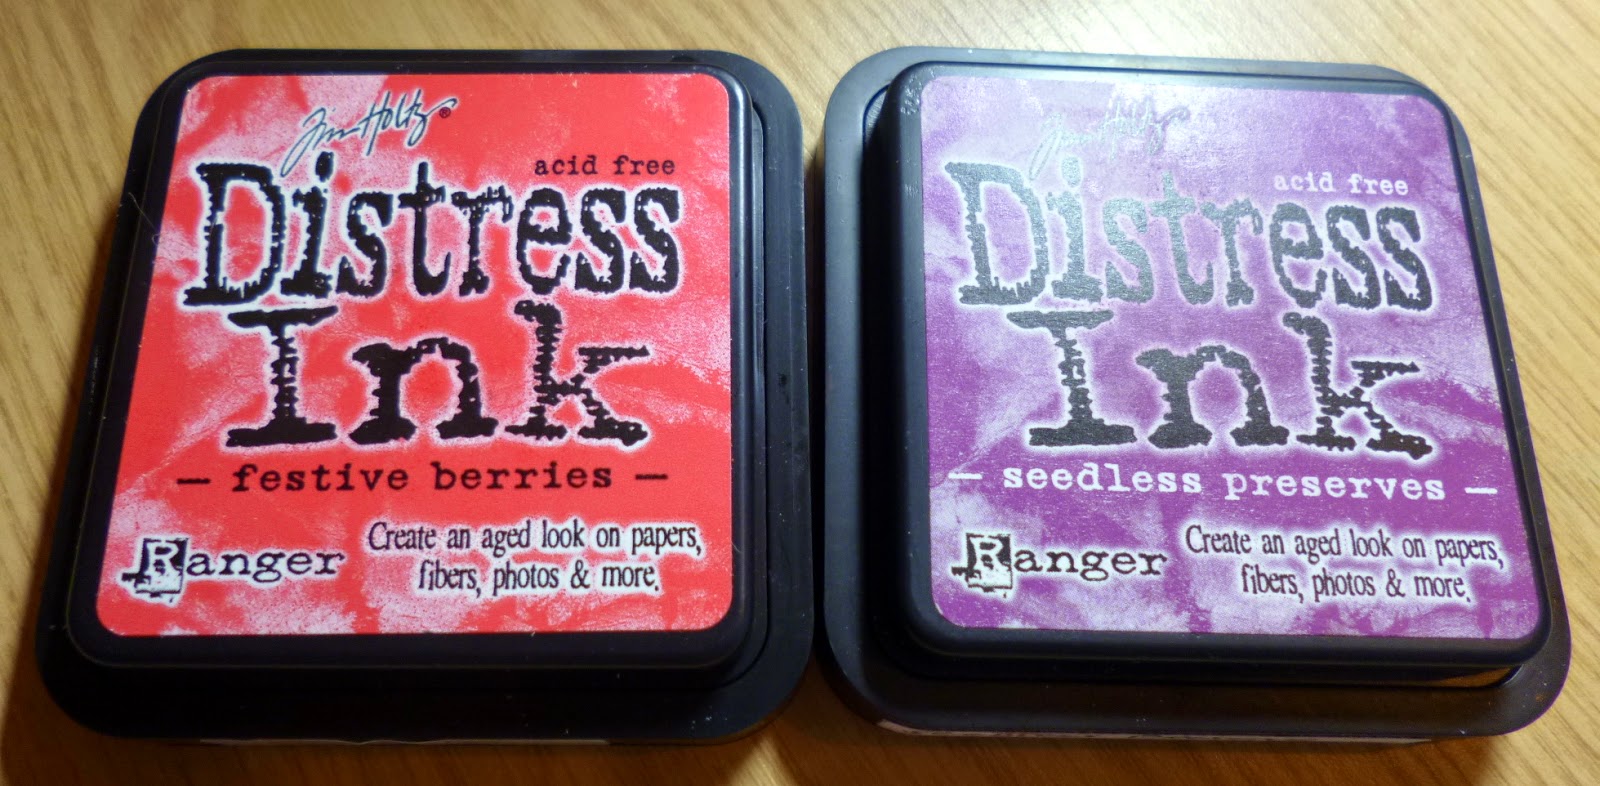
Ok back to today's card , I know its still a little early but I thought I'd do a little Christmas theme card , You all know how I love Visible Image stamps and these are from 3 little sets and I chose a gorgeous red with Festive berries distress ink and a purple  seedless preserves and at first thought I would think hmm not sure but I love how it came out.

What do you think?

I cut myself a piece of white stamping card and used black archival ink to stamp my Enchanting snowflake stamp randomly over the page, stamping off the page too. I then heat set them and took the script stamp from the Revolution set but first I used an anti static pad to run over the page to ensure no transfer of embossing powder on the snowflakes, I used the script in just two places on my background and embossed  with Clear detail powder.
I then took my inks 
 Festive berries and Seedless preserves from Lord Holtz of distress mansions.

I used the two colours in my usual way and blended them together in two layers on the background , I also took my snowflake and stamped it in each colour tone on tone and added a little interest into the background too. 
I took the swirl from the Revolution set also and stamped it randomly in the top right and the bottom left corners and added parts of the swirl here and there with versamark again and embossed with bright gold powder, I also took a piece of card and stamped and embossed in gold 3 snowflakes which I cut out and stuck together to stick to the card on the left of the sentiment.
 Here us another full view, You can see the lovely Winters miracle verse written by our lovely Helen of course. I cut it out with a Sissix framelet die and I just love the shape , it is so pretty and fits the verse perfectly, I decided  I didn't want to cover the lovely background more so I just inked the edges of the sentiment slightly and sprinkled glitter all over the edges and all over the snowflake too.

 I then did lot s of matting and layering , some on foam some flat and wrapped a piece of purple ribbon over each end of one of the mats and added a little bow in opposite corners with the snowflake hanging (kind of) on the left with a pretty bit of bling in the bow centres.

 Here you can see I  also pierced one of the mats for this card as it looked so pretty.
And lastly a long look at the card from the corner so you can see the layers and the dimension on the snowflake, all I did was fussy cut out the three snowflakes and bend them n the middle and hot glued them together , I threaded and glued a piece of gold string through the snowflake and added it to the ribbon on the card, i added the little bow on top and the bling to finish it off. 
adding a few little pearls to each ribbon too.

Here are the stamp sets I used for this one.


                  Enchanting Snowflakes                                     Revolution
Winters Miracle.

Well I hope you enjoyed today's post and You will all leave me a comment so I can see what you think and I will see you back here tomorrow for CE weekly DT post.

Huge hugs and lots of love

Kim 
XXXX


Sunday, 14 September 2014

Sunday and ooo its chilly..

Hi Lovelies

Well I thought we were in for a warm weekend as yesterday was sooo hot here but noooo so thank heavens for the neighbour at the end of my gardens kitty well she came running in at 8 this a.m cuddled up on my lap wrapped in a blanket of course and sat with me while I had my cuppa and warmed me up a treat. Then I twigged I was warming her up as she had her bottom half on my lap top too and did not want to move , even the paint smell did not deter her today. So she won and I had to wait til she was warm and went off home for fear of cat hair in the paint or paint in the cat hair hmm not sure which would be worse lol

Welcome to the couple of new gals joined onto the blog since Friday , we are a lovely bunch of wonderful ladies on here so feel free to leave comments and start chats as I do try to reply as often as I can. Once I reach 200 subscribers as I said last time I will have a nice giveaway so yayyyy , so looking forward to that. love giving things away.

Ok usually you would see me blogging for Visible Image today but we have had a shuffle around so I am now on Wednesday for that and in the meantime I have been showing the cards from my last show with Creative Expressions on Create and craft tv, so here is another.

 This one is a little different in that I used the Hemp ribbon on the show to make a background and coloured the edges with some of the Hazelnut Adirondack and Lord Holtz's Vintage photo, I cut the bottom which I left free into forks so you could see the mat and layer underneath. I also stamped the word Soar 4 times on the bottom of the next mat and layer set. I also stamped out the Hot air balloon from the Just Rite gorgeous set of stamps on the show and cut it out with one of the vintage labels 4 dies also Just Rite, I turned it over and drew around the die also to get a faux mat.
I all stamps out 'Be a traveler not a tourist' and cut it into a ribbon band with fork ends, matted onto black and added to the card with a bend in the middle and some flat back 5mm pearls finished the job. The embellishment consisted of a ribbon bow made from hemp and coloured to match a beige zipper rose atop of that with a couple of the metal tassel's showing from under the rose too.
 Here is another angle so you can see that it really is quite dimensional with all the layering and the way I have encouraged the ribbon to curl in all the same direction etc.

 A close up shows the lovely words on the tag, the shading on the balloon to give a domed appearance and a close up on the hemp.

Here is the full view again what do you think, another winning male one do you think?

Ok here is part two card for Sunday.

Here again I have used Just Rite products , here is the map background stamp in Plum which looks a little more pinky on film but it is very purple in person, I have brushed the colour out with a water brush after stamping as there Adirondacks I am using are die based so I can blend with them and they react to water just as the distress stains do but take a little more work to blend. As you can see this is very simple but looks more because of the extra mats etc. But even the Bike stamp which is gorgeous was so easy to stamp and is a creative expressions one as I just used the one colour and brushed it out a little and added a tiny sparkle to the rims and handle bars etc but it really doesn't show much on here I am afraid.

 I think you can just see it in this close up along with the script in the background behind the bike.
 This simple 3 layer seam binding bow has some tassel's and a vintage flat back embellishment with a 5mm pearl on top and pearls in the corners to finish the look.
Here it slightly laying back to show its layers etc.


And lastly the corner shot which picks up the colours,layers and sparkle more I think and gives you a little close up on how dimensional it is and of course keeping your layers matching and straight makes the over all finish look so much more professional. A little tip when you finish is to make sure you have no fingerprints on the back and if you do simply add a clean sheet over the back and cut the same size of give it another mat the same colour either way but wash those mitts and work surface first and dry them, I have started to keep a dry micro fibre cloth on my lap always usually tucked in my waist band so It is always there each time i wipe down and wipe fingers, silly tip maybe but it really does help me.

Ok my lovelies I hope you have all been watching our lovely Sue today on C&C and wow doesn't she look stunning, although I am not demoing at Aly Paly now this coming weekend I will still be popping in to give them all my support and have a cuppa so if any of you do go please say hi , I really would love it and of course Visible Image and Craftwork cards will all be there too ,so yay all round.


                                                        See you soon my Blogglies.

Hugs
Kim 
XXXX


Friday, 12 September 2014

Its Frrrriday....!

Hi Folks

It's Friday and I have just been back and answered all your lovely comments so don't forget to go check out your replies, I feel so blessed to have you all on here you are all sooooo fabulous darling hehe.
Welcome welcome to all the new ladies who have subscribed since the last C&C shows and I believe we are getting near to some giveaways, 10 more subbies and I have 200 so I will do a big ole giveaway with lots of goodies then so encourage anyone you know who would like to try to win some goodies to come sign up and we will get there in no time I am sure.
In the meantime starting next week I will go back to giving some cards away etc so we will gradually get all that good stuff going again now I'm back , yup I am definitely back and loving being with you.

So today I am going to show another couple of cards from the show last week and I hope you like them so without further ado.

 Here was my aged sepia toned offering from the show , simply called Bon Voyage. I actually love sepia tones be it in old pictures or mixed media which you all know I love anyway but it is just so warm and yet subtle, I love black and white photos too and have some really gorgeous ones of me and my late husband with the kids which he took with the filters on to make it that tome, brilliant.

 Here is a close up on the gorgeous old car and you can see I used the script stamp in the background which I made inky and flicked water at and dabbed with kitchen paper to create those splatters over it too.
 Another viewpoint to show off the layers and the bow was tied with some of the Bakers twine all Creative expressions which I know a lot of you have of course.
So here is the long angle again the card is actually taupe and the layers are black but for some reason it looks a navy tone on here but it is definitely black.

So on to card number two.

'Carte Postale'
This was the background that Lovely Leonie really wanted me to show but we ran out of time (as always, I definitely need a longer show with her). I will do a background very similar soon so I can show you how it is done with all the layers as I promised on the show I would.
 Here is a longer view and on just the page I used for the backing there is 5 layers of embossing alone, then all the mats and layers build this one up nicely don't you think?
I used the Adirondak Inks on the show in Citrus and Plum to create this one too, Love the combo and still totally possible to give to a man as I kept the bow to the hemp natural material too.

I loved this little verse so I took a close up so you could all read it too (even though it is a little burred tut)

Ok my lovely blogglies I hope you have a wonderful day and that it is sunny and a good one for you all, I look forward to reading all your lovely kind words later and of course answering them too.

While I think of it , I have a new day to blog for Visible Image which will go from Sunday to Wednesday and in the meantime i will be catching up with lots of goodies to show you all.
My next shows at the moment unless anything changes are the 8th and 20th October on C&C so leave a note in your diaries.

Huge crafty hugs to you all

love

Kim
XXXX