Sunday 30 September 2012

LACE..


Evening bloggers... How was your Saturday? Mine started off blaaa with work first thing in the cold after being in a lovely warm cosy bed but it was only three hours so shouldn't complain, the hospital I work in is closing too so we're not sure how long we will even be there so... Anyway enough of that! I made a card I really like today, I'm absolutely loving this Craftwork cards collection, it's the Bohemian and the pad is soooo glitzy and the papers with no glitter are sooo perfect for making it a bit grunge but pretty so here is my stepper card made as tribute to Bohemia with added lace.

  • I started with cutting the pad down a bit because I wanted one of the papers with just the chandelier showing. 
  • I then got the matching stamp also from the same collection and over stamped in black, I inked all the edges with my trusty Distress, Then thought this looks a little flat so i went back over with an embossing pen picking out the chandelier and poured on clear enamel and heat set, all this was then matted onto black card for drama.
  • That was much better, I cut out an extra section from the top of the pad and trimmed along the lace design, Matting it on to black. While I was doing that I cut the top of some lace and added that to the small piece of card as I was matting it.
  • That was it, all the Lace ideas started jumping in my head then, so i cut out the pieces for the back sections, inked and matted them to match adding the lace as I went.
  • I had the stamps for the lettering so I stamped LACE and added clear embossing in 2 layers then swiped over with mica for little shine and heat again. I made lots of flowers in the corresponding colour from the pad and attached them with little pieces of lace and then went over with some bling for the chandelier and some lace Craftwork Candi, my little sentiment was last and tucked in their nicely with another inside the card matted on paper from the pad we were done.
I really really love this font and also the craftwork letters that you get in some of their kits too. And I like to matt them onto card and add them at differing heights like on the cards I used for the Stamp addicts samples.

Here's the closer picture of the flowers that are really pretty I think.
Have a great Sunday and will add more tomorrow. Sleep well everyone!
Kim xxx
                                                                                     

Saturday 29 September 2012

Pick of the Bunch

I was asked by the lovely Julie Hickey from Craftwork cards if I could make some cards for the great Northern paper craft Extravaganza coming up soon. She gave me a gorgeous pad of paper and frames and new candi so I could have some inspiration as I worked; it was all from the new bohemian range which is glittery goodness and very lovely... Tonight I sat and made two cards which turned out really well with lots of embossing, over stamping and inking/blending which I love.

I have broken it down into a few pics so you get to have a proper look at the embellishments which are in the paper pad which I have inked and curled and moulded, added Versamark and embossing powder, heated, then added mica powder and heated again which allows the mica to sink into the enamel and so becomes permanent, so no rubbing off with handling.

It took a fair while to complete, even though it looks simple because the glittered paper is so beautiful. Julie is also going to ask her friend Nikki up at Leeds to photograph these cards to add to the  craftwork cards blog which is great. Thanks again Julie, such a lovely lady!

  • I took an 8x8 card base and added some pink card, I used some American craft card in valentine colours. I trimmed my sheet of paper from the Bohemian pad and Layered it on to the pink mat. I punched a thin strip of paper and added to the left hand side.
  • I took one of the frames and added some colour to it and some spray glitter to give it a lift. Then I added some rock candy paint all over and dried with a heat tool til it was all cracked but sparkly. I decided it wasn't dark enough so I rubbed more ink into the cracks, I love the effect here! After adding the little sentiment on top of the frame here, this section was complete. I have to say in this picture (because the lighting is rubbish) the frame looks orange, but it is in fact pink and distressed a little.
  • I moved on to the tag next.
  • The tag came in my Bohemian goody bag I received from QVC the shopping channel, and it matches the free pad from Julie so i inked it with my Distress Inks and then covered it in Versamark and embossing powder and heated, I will never tire of the change as it transforms... I did the process again to make it really smooth and shiny. I added my ribbon through the tag also and a small piece of the thin punched loopy paper to add to the tag.
  • I popped out lots of flowers from the pad and curled them, inked them and to some I added bling, some candi, and some I curled some tiny swirls for the centre of flowers.
  • My insert was the same design paper without the glitter all over, so it could be written on. I took the piece of paper that the flowers were attached in and used it as a mask with my Pan pastels. I stamped the amazing Clarity stamps sentiment onto it. 
  • Lastly I had a skeleton leaf, not everyones fave but I added versamark and embossing powder to it, melted it in and did the Mica technique again. I added it to the upper right corner with a flower. Some of the flowers I used I also enamelled as you can see in the last pic. You can see just how much beautiful glitter is on this paper in this one too.
Well it is now gone 2 a.m... I'm sure my son is still partying from his birthday and rightly so! lol But I have to hit the sack as back to work in the morning.

Night bloggers, and I hope you like my card, If you go to the GNPE then I wonder if you will see my card there... Let me know! I have my very own stamp which Clarity stamps made and I love it, I have never had  Polymer stamps so good as Barbara Greys.
So look out for my stamp if you go to the Craftwork cards stand.. I really wish I was going, I truly would go to every show if I could, and be part of it all.  Big sigh lol.

Have a great weekend and look out also for lots of new posts.
Kim xxxx

Andy Mega Day

Dear Bloggers,
Firstly, I have to apologise for neglecting you this week, I have been a very bad Blogger and not had a lot of time for you. I hope to rectify that this week as after tomorrow I have the week off of my day job and I have a few deadlines to catch up on. So, plan to see alot of new cards!

It was my lad's birthday on the 28th, and I sent him a little card for his special day, he is now 24.

I used The Kanban So Macho kit as it had a Binary code background card which I thought was cool and I made the flowers from it too. I just love Kanban. I hope he knows how very proud of him I am.
ahhhhhhh I know and one week til I see him yay!

Sunday 23 September 2012

BS&SBS At Ally Pally , Wood Green. 22/09/12

Well bloggers,
It has been a fun but busy Saturday, so no card til tomorrow, but I thought I would share with you that I went to the Big stamping and scrapbooking show at Alexandra Palace today. What an amazing place! The views were spectacular, so I thought I must share...


I got there quite late at 11.ish a.m and unfortunately a lot of the car parks near to the Palace were full, so that was the down side.  However, I stood in that very spot and admired the view, sun, fresh air. Absolutely breath taking.

There were no real queues buying my ticket though, so that was good. I went inside the building and was struck by the beauty of the place, but then I noticed all the stalls... O my goodness crafters' heaven..

I met so many lovely people, Leonie Pujol was lovely and just as slightly crazy as she is on Create and Craft TV, and there was no rush to move on just stood chatting and watching her demo.
What I think apart from all the gorgeous goodies that asked to come home with me... I was struck by how well organised it was; this event has clearly been running a while.

My last stop was to visit the amazing Craftwork Cards stand, if you have seen much of this blog you will no how I love Craftworks cards and papers. I am always using Inks on them and adding them to my designs. I met again the lovely Julie Hickey who has asked me if she can use some of my cards on an inspiration sheet for Craftwork kits on QVC, which I'm very happy about. Also she introduced me to a lovely lady on their design team called Emma Williams and we had an instant crafty connection, isn't it wonderful when you meet someone who is so very similar to yourself and just gets you.
Thanks ladies for a great chat, made my day!

All best wishes
cards for tomorrow... can't wait to start but must sleep...
Kim xx

Friday 21 September 2012

Kanban New Card..

Hi All!

Laying in bed at 11.48 pm, so posting today's card from here. I was so exited my new Kanban kit arrived today, yay! So I thought I would dip in with a really feminine little number. I really enjoyed working with it and love the new lighter weight cardstock, but I loved the other card anyway. Kanban use mostly uncoated card so you can carry on and ink over the top and I do that a lot.

I searched my stash and couldn't find a flower that I liked to match this one so I made one using some flat paper flowers and I inked it and spritzed it with Cosmic shimmer sprays, which I love with all that sparkly Mica. Ta da! The flower:

  • I chose my topper and background card to start... Then used weathered wood Distress and inked the edges and corners really well. I have a small flourish polymer stamp and I over-stamped the corners and all around the page.
  • Matting this onto the Kraft cardstock I chose to use this horizontally, not vertically for this one, you can just see the lines in the picture but it feels fab.
  • I added the border across the middle of the card. Then matted and layered some kraft again onto some black card.with a lattice punched peice of paper from Craftwork cards.
  • Then I used some foam pads to raise this mat away from the card a little. Adding my topper of the wonderful Roses, I went round the petals with a sakura stardust pen and made them twinkle a little. I got carried away and added it to every swirl I had over stamped onto the blue cardstock too.
  • I made my bow from three lengths of American seam binding, which is amazing. Using the spritzer spray I added a little to the edges and scrunched it a little. Adding it to the corner I covered the centre with a matching sparkly button with a blue Aurora Borealis coating. I added some bling and a sentiment.
  • I matted and layered a sentiment inside too and made a matching box.
I added the picture of it to Facebook and Dawn Wheeler commented and said it was fantastic and so pretty! Shes so lovely and works of course for Kanban so I'm glad she enjoyed seeing my card.

I don't know if anyone saw QVC tonight but I enjoyed an hour of Craftwork cards with the Lovely Julie Hinkly, I got lots of inspiration. I just love their products, as you see from this blog I use their
crafty goods all the time.

Anyways, happy Friday folks, I'm working a half day tomorrow so I'm looking forward to that.
Kim xx


Thursday 20 September 2012

Flutterby Roses.

Good Morning All!

Here is a card made with a very recent kit I got from Kanban. I was playing around and found the lacy rose effect ribbon so I decided on an Easel card. Dawn Wheeler designed the kit and it is beautiful; she did a great job, such a romantic girly feel to it this one. So I had a play and went totally OTT with it, but some how it works.

I love the backing rose card matted on to black, the photo I'm afraid isn't great as it's silly o'clock and the lighting is pretty poor.

I have embossed butterflies with pearls on their backs, rafia ribbon and spiders web material tied up into bows too.

Simple and elegent but lots of elements that took a little while to secure. Tomorrow in the day light I will re-photo and hopefully that will be better!

Crafty hugs,
Kim                                                                                                                                                                                                                                                                                                                                                                                                                                                                                                                                                                                                                                                                                                                                                                                                                                                                                                                                                                                                                                                                                                                                                                                                                                                                                                                                                                                                                                                                                                                                                                                                                                                                                                                                      

Wednesday 19 September 2012

Fly away with me/project space

Good Morning Bloggers!

Well I say good morning, but it depends where you are...
Anyway a sweet little 5x5 card is a quick offering... I finished off my 30 "thank you" cards and made a box wrapped in ribbon to go with them! Very pretty.

Anyway... How quick do we deviate from the original plot... I blame it on my age but it is probably more the craft brain running 100 projects at once, then new ones queuing at the door waiting to push the brain cells over for an inch of new project space... hmm

So my little card is made out of leftovers from the backing diamond mirri card, which I had used to make my bauball card too. The flowers were left from using a Chloe stamp and making some cards with it after stamping embossing and cutting out. I used different levels of foam pads to raise up the frame and topper in the centre. Bling in the flower centres.
A little way to use up some of the huge leftover stash we all collect.

Exciting news for me... News of more exposure and a little more publication of my cards coming soon
It makes me so proud to see anything that I make published and to see my name written in print, and I will never tire of that moment when someone thinks your work is nice enough to be included in their company's flyers or magazine, I really want to be able to do this as a full time job, and won't give up trying to get to that stage! And we all never stop learning and growing so I'm thankful to all the people who have enjoyed my work so far and have asked to publish it and all the special people who support me, especially my editor-in-chief Son Andrew and My clonie Daughter (she knows)  Mandy and my late husband who was always my biggest supporter and would be patting me on the back for every tiny step.

Have a great Wednesday already half way through another long week...
Kim
x

Saturday 15 September 2012

Owl be seeing you..

So today's little treasure is 6x6 and the topper is from a kit which I think is Kanban but I have had it a long time, I dip in an out of it but this was quite a cute one I thought.
It utilises a flower I made up from Hunkydory.
  • Firstly I inked the backing card a little in purples and green then added some purple ribbon strips.
  • Then the card choice for this layer was retro flowers. For some reason it didn't clash like some would with all the patterns. Atop of that I added a green strip of paper to the left.
  • After inking the topper and adding some cabochon stones to the eyes to make them sparkle, I mounted it on foam and matted onto the card just covering the top of the green paper. 
  • I added my flower to the left, which I made by curling the edges around my pokey tool for each layer, and adding sparkle to the centre.
  • The bow and sentiment, and a little bling in the corner finished it off. Although I did go back and add a little faux stitching in black around the edge which makes it look like it's been paper pierced on the edges.
Have a great Saturday Crafty bloggers! I have a project to finish of 30 small thank you cards for a very special young lady. And also My girl is going to a fancy dress event tonight so we are off shopping for the outfit. I think I will end up doing more stitching. Haha!

What are you doing?
Kim
X

Friday 14 September 2012

Tv cards

Well today was interesting, as I got to see the cards I posted yesterday on Create and craft, wow seems so odd seeing your cards being shown on screen, but how cool.

Howard the presenter was very amazed by my cards and tried hard to work out how I had aged them, haha!

My lovely son sent me a screen print so I could post it and show you all a quick shot from today so here it is:


Wednesday 12 September 2012

Tv cards for Stamp Addicts 13/09/12

Hello all!

Here are the cards I made for Stamp Addicts over this last week. They are on Create and Craft TV tomorrow at either 4 or 6, I'm not sure which, but the stamps were lovely to work with and easy to build a picture with. It was good fun, as they are a different g,enre for me.

This was Coloured with distress inks and covered in rock candy, then rubbed with black soot to give it a smoky, shadowy atmosphere, like on a stage! I found a great pack of papers that I had stashed away for the skin type background too.

The letters were Craftwork Cards mounted onto black card, some raised, and some flat. I took some little wooden stars and pressed them into Versamark, and then tipped on lots of embossing powders mixed with a little utee and glitter, melting it on and adding them to the topper I made.

Lastly, took a couple of musical peel offs and added them to some mats and layers and found a way to attach them.

Next...

This is a bat playing a guitar, so I thought I would colour him in greys. For this, I tried Promarkers this time. I managed to get a good blend and used Greys mixed between cool and ice.

This is a stepper card with the big guitar in the back cut from a rock paper pad I had, fab quality, more like card. I coloured the guitar in mixes of orange/red and dark red. Then I added glossy accents to that and his sunglasses, they dried really shiny and raised.

I used another backing paper with lots of silver guitars on the back and the bit left over. I cut a guitar out and mounted it like real guitars on walls. Made some flowers using petal pairs punches and glitter and glue in the middles. Finally added bling and done!

Next..

I love this one and when I stamped it I thought I'd make a background card using just the head, but I didn't realise I had a bit of ink on the word part and it stamped Vini on the right! So the turtle after that had a name (unless the Stamp addict ladies already gave him one). To me, he is Vini the turtle!

Again I used some fab papers that really do look and feel like reptile type skin. Two of those flowers I made a while back from paper made it onto this one.  I used also some Debbie Moore backing paper from her vintage travel pack  punching out some extra paper in strips and adding them for dimension.

I coloured old Vini with Sakura pens mostly but there is some distress inks in the mix too as I couldn't always get the right colour for him with just Sakura.

I used the technique of putting fresh water over the eyes of the stamped head background and blotting it back off so it goes back to the original white of the stamping card to stand out.

A little white pen faux stitching and bling, and a bow, and also some raffia helps to finish this one off.

I also did...

The lion.

I mostly coloured him by dobbing my inks onto my craft sheet and using a water brush to wash the colour onto the card. I built up layers of colour allowing a little drying time. I used a craft cd of Joanna Sheen's to print the grassy background. And lots of matting and layering.

Due to The wizard of Oz, when I think of lions, I always think of the cowardly lion needing his courage. So I decided this would be a good luck/courage card. I drew a paw and layered that too and again used the Craftwork Cards letters and matted them on black, added bling on some not others.

I also tried him a different way...

I used some Papermania papers on this one. An Easel card which I thought I'd have some fun with so I added a background and over stamped some branches I gave him a daisy chain necklace and drew a golf ball in. I had him standing on a stump of grass and more daisies and then used a sentiment I had saying:

"Take the time to walk barefoot in the grass making daisy chains and Believe in the beauty of your dreams." From Indigo Blu who I absolutely love.

I used it like a sign post and enamelled a piece of card that I had made look like wood.
Lastly, I made some flowers again with punches, layering them up so as to make them look like little but full blooms. Bling finished him off... not literally.

So these were the cards I sent and I'm looking forward to seeing the shows tomorrow.
I thank Sarah for choosing me to help her showcase her lovely stamps. 

Hope you like them!
Happy Crafting
Kim xx


My best friend..

Evening Crafty people.

How was your Tuesday? Good, I hope. I still have a snotty nose but the cold is starting to go. Yay.

I received news that some cards I designed for Stamp Addicts are going on Create and Craft TV on Thursday! The show times are at 4pm and 6pm, so I'm looking forward to seeing them on TV! Of course, I have photographed them, and I will upload them here after the shows, as I don't want to spoil their new stamp reveals!

Anyway, of course, I have a little offering for today and so here goes, hope you like it.

A cutie for today. This is a Crafters companion Swalk range stamp.

I think the image is really sweet and the words very true... I actually just stamped out the image to have a play with my Sakura pens, which I brushed out with a water brush and I quite like the effect.

Not too keen on the psychadelic pink of the dress but it can be changed, even some paper piecing would be fun if I couldn't cover it with colour.
  • I started by colouring the image on some really good stamping card. I always recommend Centura pearl turned over, although I recently discovered Stamp Away stamping card which is very reasonable and holds the image well too.
  • Next I matted the white card onto some black. I added some little jewels in the corners for balance.
  • I chose my backing paper from yet another free pack, this time out of a mag, and matted that onto black also.
  • I had a ribbon in my stash that matched nicely and wrapped that around my backing paper mat.
  • I layered them up and tied a pretty bow for the corner, I dressed the bow with a nice big jewel and added small ones at the corners of the card.
  • Lastly, I had a craftwork cards flower which I added a bit of sparkle to and placed it at the front for dimension. It was actually a raspberry sort of colour in pearlised card, but it came out quite dark in the pic.
So, a sweet card but I love the way I managed to get the hair to shine and nice rosey cheeks too and I did not use anything but Sakura pens and water. I love alcohol pens and Distress inks, water colours and other mediums, but I wanted to show how it can all be very simple too.

Have a good wednesday and I will meet you back here tomorrow, don't forget Create and Craft Thursday 4&6.
Kim x

Monday 10 September 2012

The colour of Purpleness.

So, Monday again already, although a few hours before work yet... My temperature a little more settled, I thought I would make up for the lack of posts last Friday/Saturday with an extra one!

This card is another that was featured proudly (look at it puffing out its chest) in this month's Create and Craft magazine.

It is a complex little character although not instantly recognisably so... oh dear, you would think I was discussing some fine wines... No, but a fine card it is! I have another picture and you may see from it why it is more complicated than first thought:


That's right, it is partly acetate. Therefore, me being slightly OCD about details and covering up workings and bits, find it slightly more challenging to make an acetate card as I can't possibly have white showing in the centre unless it is the part left to write on. Therefore I used a lot of dusty concord in this one and lots of backing paper too.
  • I started by taking a Dawn Bibby stamp and stamping her flower image and leaves all over a piece of A5 card. I stamped a few extra onto a scrap piece and cut them all out and inked them, I took the smaller size and stamped another three and cut and inked them too. I curled the edges glued them and left them aside.
  • Then I inked the stamped page and using a water brush took some extra ink and coloured in the edge of the flowers and some leaves too. I attached my acetate to the A5 card and took some purple Papermania Capsule collection paper edged the side and covered the working edge of the card too. 
  • I measured a smaller piece of card for the front middle panel and inked it a lot, I then stamped on my same flowers and coloured them as before, then took the flowers I had made and curled and attached them to the newly stamped ones and found something pretty for the middles. I had cut a pretty wavy edge on this card which was of course the unpearlised side of centura pearl, Anyone who knows me knows I love to use the back of this to stamp and the ink blends so perfectly on this too.
  • I used four sparkly Brads to attach this to the front of the acetate card. Then I needed to cover this on the inside, so I took a matching piece of paper and covered the inside. I stamped out the sentiment, and inked the edges to match and attached this too.
  • My ribbon was an ivory/cream colour so I inked this too and dried it carefully as I didn't want it to wrinkle or burn. I wrapped my card with it and added sparkly pins to the knot. I matted and layered sentiment for the front of the card and the cover on the back was my last touches.
It was featured on page 20 right at the top which was very nice and I hope it will be the first of many. Have a great Monday, don't forget to come back, feel free to comment and chat or ask to see anything, I will always help.
Kim x


Sunday 9 September 2012

Happy Christmas Bauble

  • A small xmas card today too. I was sitting chatting and playing with a piece of silver shiny card and stamped out 2 circles, that was it... I immediately saw baubles so...
  • I took a piece of card and embossed it and added some forest moss Distress Ink to the edges and also some bundled sage. 
  • I took a couple of ribbons and wrapped it around the embossed card. 
  • Laying out my Baubles where I wanted them to sit I placed my sentiment where I wanted it to go and Drew in black pen a chain for each Bauble.
  • I raised each Bauble on foam to stand them away from the card. and stuck them down, the same with the sentiment.
  • I added jewels to the disks to make them sparkle and used tones similar to the inking. 
  • then I mounted the card onto the base card which had Baubles foiled onto the sides in silver which is very pretty.
  • The last thing was to tie a bow for the left hand chain on the Bauble and add more jewels to the edges and it was finished. 
All this from sitting holding a piece of shiny card... It was a very quick card to do but I'm sure someone will be happy to receive it for Christmas time. 

Especially for you

Hello Crafters
First of all Happy Sunday, Hope your all having a great weekend out there in blog land, I've been tucked up in bed most of it with a rotten cold so no new posts last couple of days. Today I got up and decided I must get some new cards to photo and share with you all.

I found this lovely little topper of the Hedgehog in the pinny watering her Daisies in the garden and wondered what I could do to bring it to life. 
  • Firstly, I added some glossy accents to the middles of the Daisies Which looked pretty I added some also into the water can but somehow it wasn't enough to look like water so then I added some micro beads (these things are actually smaller than a pinhead.) the effect was lovely although you can't really see by the photo but it looks like water spilling over.
  • Next I matted it onto a toning piece of card stock.
  • I took an 8x8 base card (which I use a lot as I like the amount of room this square shape gives you to create.) And found a lovely green backing paper I inked it slightly to give it a bit more tone and found it looked a bit flat so added some lace embellishments in the form of rub ons to the bottom of the card and also to the top left and bottom right for balance to the topper to be placed.
  • I wrapped a thin ribbon around the green backing paper and made a messy bow ready to add at the end to match.
  • So I stuck down the and added the topper onto the lace rub on added earlier. I took a sentiment and distressed it a little and used a little white pen to go over the 'Especially for you ' text as it looked a little too perfect. 
  • I attached my Bow and then found some lovely natural flowers in my crafty stash so added a few top right and bottom left again with the balance in mind. and my last addition was to added a small flourish which I cut down from a larger one in my kit. to beside the sentiment.
  • Of course I added an insert as I feel no card is complete without something to finish the inside whether it's a matted and layered sentiment or a personalised text or even a pretty paper with a sentiment but never a blank card. 
So that's today's card, hope you liked it and that you pop by an see the extra items to be added this week.
Kim x

Wednesday 5 September 2012

A Darters dream.


As promised, my commission was for a lady, from her work mates. They said that her fave things were pretty much darts, booze, and a laugh! So this was the result of internet trawling lol!

I think I did very well and even downloaded a poem especially for Darters called The Darters Prayer.

Hope you enjoyed your extra post.
Goodnight all
Kim xx

Pink Roses

Hi all.
Hope everyone is having a good start to their week. Wednesday has just started with it being 12.53a.m here. Before I go off to sleep I thought I would add a little card here for you all to view. I really would be very happy to read your comments if anyone would like to do so. I also will be sending out a card to the first person who does leave a little comment as previously mentioned, that person will also get a shout out on my blog and other social media sites.

Now to the pretty card, as you can see it was a quick creation though very pretty.

  • I started with a Kraft card base 8x8, stamped a sentiment inside and my logo on the back.
  • I took my pink vintage paper and inked edges and corners with Tim's Tattered Rose and a little Victorian Velvet. I do this for two reasons, the first to blend the edges to give it a much softer look so the focus changes as you view the card. Secondly, this way you don't have stark white edges therefore a more professional finish. I added a ribbon and a sentiment wrap from craftwork cards and attached the whole thing to the card base.
  • I took a core candi mat form Kanban and instead of ripping the edges to expose the coloured core in the card, I put some thick foam on to the back right against the edge and added some glue around its edges.
  • I then folded back the scored pieces as I said instead of ripping them off, this makes a little platform raised up for a topper or flowers or anything really, In this case though I'm using a Kanban rose topper, which is stunning and speaks for itself, needing hardly any embellishment.
  • I added the topper and a bow and also two coloured pins in the top of the topper but pushed into the foam under the platform. I was happy with its simplicity, it's an elegant card.

Have a great Wednesday guys and come back tonight for a new post featuring a dartboard, a number and a bottle of champagne. It was a fun and different commission with lots of elements.
Kim x

Monday 3 September 2012

Time.

Evening Blogland!
How's your day been?

This is a late post but I simply had to put up a card, even though the photography in this light is not great at least you knoq I'm here everyday to show you lots of crafty goodness.

This card is one I made a short while ago. It was when I first got some Debbie Moore Embossing Powders.

I also used the technique of stamping into melted ultra thick.

  • I took a Kraft card base distressed the edges and added a ton of ink to the edges (good old Tim).
  • Next I chose a Craftwork Cards Vintage 8x8 paper in a tan colourway, cut it down slightly and used three different Distress Inks to add colour and blend the paper really well at the edges. I used Vintage Photo, Walnut stain and Aged Mahogany. 
  • Leave the paper aside to dry a little, or you could use a heat tool. I took some Ribbon and Bakers Twine and coloured them with the Inks to match. 
  • After drying the string thoroughly I wrapped it round the paper and secured on the back, cutting off any bulkiness (if only it was that easy to diet lol).
  • Next I secured the paper with string and ribbon attached to the card base and set aside. I took a Mat and Layer and ran them both through my little textured impressions machine, the larger piece is actually Mirri card, I sanded them both back a little to reveal the embossed clocks.
  • I covered them both in Versamark which is really a sticky ink that embossing powders or Micas etc can adhere to. Then added little blocks of matching colours ready to be melted with the heat tool.
  • Once melted and sanded  I roughed up the card, reopened and flattened out, I took some Glossy Accents and highlighted the clock faces in places.
  • I took a pile of ultra thick and put it on my craft mat (non-stick, Heat proof) and very slowly melted it down. 
  • I stamped my clock from Creative Expressions into a part of it waited for it to harden a minute and then bent the craft mat so it popped off . That's a great technique and it looks so cool.
  • I laid all the pieces so far onto my card base that already had the paper and string etc stuck down.Adding ribbon to the small Mat. I found how I wanted them and stuck them all atop of the ribbon and twine with Pinflair glue gel. I also stuck my melted utee with this.
  • Lastly I took my small pocket watch embellishment and stuck it to the card dabbing the edge with a little Versamark, sprinkled on some utee and carefully melted it, taking care not to remelt the piece we stamped into earlier. 
  • I added a sentiment on the top right hand corner which I distressed with the same inks to match.
  • To finish wrote a nice quote in white pen on bottom right.     
I wonder if you will try that or it isn't your thing?  For me this is one of my favourite things to do, just to sit and play and see what happens and how the art takes you. I was pleased with the result and enjoyed the process and was up to my knuckles in Ink and un melted utee that I managed to blow everywhere. I've seen a much better heat tool by Sheena Douglas, whose art I love, which disperses the heat much more gently so you don't lose half your powder! Haha!

Thanks for stopping by
Kim x


Sunday 2 September 2012

A Little Bit Macrame


Well Tonight I thought I'd leave the inks alone as I have work in the morning and with inky fingers working in a hospital may not be  a good look.
I didn't have any black cord so I looked for some beads that went with my purple cord and there they were little lilac and pink roses. So pretty.

I decided to do a Square Macrame knot, very simple with double knots in between each bead. I will post a full instruction of how to do each knot. and some earings etc.

I used the moving adjustable knot and  left the cord free on the ends with little knots rather than add beads etc as I want to wear it tomorrow and didn't want to clank the glass beads on the tables at work all day. That's how to get told not to wear jewellery at work, But in stealth mode no one knows.. shhh!!

I did a close up on the knots and they may be a little blurry, working on a better camera but for now  I wanted to show the knot as they look complicated but they really are very easy.

This took 20 mins from the first thought to the last knot, why not try it!.


Hunkydory kit

This is yet another of the cards I made using the free kit from Hunkydory from the Donington Show, I have stretched it by adding mirri board,cardstock and card blanks. It seems to be going on an on!

I'm enjoying using it and purposely haven't added any card from Hunkydory's other christmas kits to see how far this lovely gift stretched and it is doing very well. I think I could get another 3 cards still from it.  Wow! Thanks Hunkydory.


Red Grasses

Morning All!
How are we this sunday morning?
I was up until silly o'clock working on a design project for Stamp Addicts.
Doesn't time fly when you are enjoying yourself?
 How much time do you lose to craft?

Right, today's little number is actually 8x8 so not so little.

  • I started with a base of Kraft card, which I love. It's also very trendy in the card making world right now.
  • Then chose a lovely Red backing card from Kanban. It is actually much redder than in the picture, but my craft mat seems to darken it. I inked it around the edge very lightly paying more attention in the corners.
  • I took a smaller peice of white stamping card, Barbara Grays from Clarity stamps (which are great) and distressd it alot. 
  • Dried it with heat gun and used my Tombo glue stick to make that gloopy mess described on a previous card. Poured on the Frantage powders in the shabby colours.
  • The fun bit: heat guns ready. Ink up your stamp ready and melt your powders. Drop in your stamp, push it down and remove it. There, a nice sharp image.
  • Rip the edges and Ink them all, no white edges here.
  • Add to card with a nice red organza Bow and Two black stick pins.
  • A sentiment and some little black stones balance the card nicely.

So, That was a very simple little card with a nice technique to practise that's very effective.
Have a lovely Sunday 
Xmas card will be posted bit later.
Kim xx

Saturday 1 September 2012

Creative little number

Hi all... It's Saturday 1st of September and I just got in from work. I did not want to get up this a.m after having a week off and seeing my lovely son, and having son and daughter together at home like the old days... ahhh miss them.

Anyway the card for today is an interesting one, as it looks so simple but it has a few little tricks up its crafty little sleeve, haha!

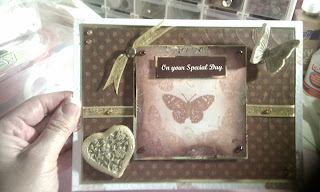
The heart on left and the butterfly on the right were both made with crafters clay and moulds. Amazing this stuff is! It dries as light as a feather as it is made from paper, so weighs nothing at all. I used trusty pinflair glue gel to stick it on to the card and it attaches really easily.

I added a little versamark and some gold mica powder, perfect pearls from Tim would be great too. Then I made a little frame of 2nd generation stamped butterflies and a bolder one in the centre. Next I chose some papers, ribbon and a greeting and hey presto as they say... a newcard was born.

Have a great saturday!
Kim x