Thursday, 19 November 2015

Creative Expressions Thursday

Hi folks

Thanks to all who have left me messages on Tuesday's post.

Today I have something completely different for you all we have another of the Flower bouquet stamps from The fab Stamps to die for range which I have water coloured and teamed again with that lovely paper pack I am so addicted to and of course a little crochet lace ribbon can never go wrong hey...


So here is the very easy to follow tutorial for today's card.


 So for the card base I have a double layer of Latte card stock with a 5mm foam in between so quite a white gap.

Next I took a piece of the purple very shiny rose card from the Bloom Beautiful pad I have been using lots
And mounted it onto plum card I then wrapped a piece of crochet lace along the bottom over hanging slightly so the pattern would show off the edge.


Here is the pad I used so that it is easily identified.


 I added those two pieces together with again the wider foam tape.


So this time I took a smaller piece of the paper and using one of the new Christmas dies that I will use on my next project for Creative Expressions I cut out a rectangle from the paper and mounted that piece onto plum card then added that to the main body we already created again with foam.


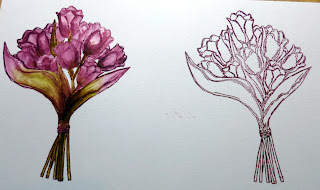
So here you can see I stamped out the tulip bouquet However I did colour them a little rose bud like hehe.
I stamped it with currant adirondack ink which is water soluble so I used a water brush to pull in colour from the lines to soften the edge of the flowers and filed in with extra colour and added some green adirondack ink and mixed the colours for the leaves and stalks etc.


 I used a stardust glitter pen to add a tiny shimmer to the flowers again water brushing them out to give a nice sparkle. I also used a white gel en to add some highlights and shine to the petals and leaves.


 I cut out the bouquet fussy cutting and mounted it onto plum card and fussy cut again before adding it to the from of the card on an angle, I also too the piece of paper I cut out earlier from the other piece and added that to plum card ad raised up on foam for the from of the card, I also punched a hole in the top. I stamped the sentiment from the sunflower Bouquet and cut it out with a tag punch which I used some May arts jute string to attach after inking the edge with a little currant adirondack to match in with the flower colour.

Lastly I tied a Small jute string bow and added that to the tag attachment and some 8mm pearls to the corners and to cover the bow knot.
So a card that could be made fairly simply with lots of pretty layers and some gorgeous water colouring which I love for depth and dimension.
I have always loved water colouring and the way water disperses on a page and how we can turn it into art.
So I really enjoyed colouring these flowers in, I hope you will too.
Have a wonderful day folks and I look forward to catching up with you all very soon.

Much love 
With kind regards

Kim
XXXX

Tuesday, 17 November 2015

Visible Image Tuesday

Hi Everyone

Nice to be with you for this weeks little offering. This week it is a about small but perfectly formed haha
I made a 4x4 chunky canvas blank into a special little wall hanging using the one of the very special sentiment stamps as my focal point. It ended up looking a little vintage but I enjoyed the technique I used which was using a heavy bodied carvable paste coloured with ink and mica sprays to give it its rich tones, black lace and feathers always adds to the drama too.
So here is this weeks little offering for the fabby Visible Image.

This is the canvas laying down but I held it against the wall and took a snap to so the feathers sat in a more natural position. (excuse the grubby hand in the piccy).

For those of you who would like a how to make this just keep on reading.


 I added a good amount to the front of this chunky canvas and simply using a palatte knife carved into it before drying with a heat gun, you can leave it over night if you refer and then you can sand the texture paste etc too if you would like a different effect. I wanted it to dry almost fabric looking so a little softer for this piece though.


This is the paste I used for reference.


 So after drying you can see it has puffed a little and is now matt.


I used three different sprays two ink ones with no mica in a reddy tone and a chestnut brown and then a gold mica over spray gives it its shine. I dried each colour separately so the colours didn't look muddy.


 I had some thin  black lace in my stash so I added it in two layers facing each other on the sides. I used hot glue to attach it but you could easily use a fast drying wet glue also however tapes wont stand up to the heat gun too much and I reheated the top with sprays several times.


 Next I used this gorgeous sentiment that I loved immediately entitled If you have hope.

 I added my sentiment using Pinflair glue so it would self level on the to and sit how I wanted to contrast with the backing.
I also added a little angle resin piece I had and added some classic treasure gold to the corners and the resin angel to pick out the features.


Here it is diagonally so you can see the light from a different angle.

I added some black marabou feathers and some little black bead stamens poking out of the feather too and some little pearls in the corners with a few tiny roses in a matching tone to the bottom right of the sentiment for balance.
So that's it folks it turned out really well and I enjoyed putting this one together.

I hope you like it, Let me know if you enjoy mixed media items and what you would like to make or decorate like this canvas or a box to cover etc

So have a wonderful Tuesday and thank you for stopping by

Love always

Kim 
xxxx


Thursday, 5 November 2015

Creative Expressions Thursday.

Hi Folks

Today is Thursday so here we have a Christmas themed card as this month I have been sent some Christmas dies to work with , so I thought Id start simple and just use one of them and create a card with some sparkle in my favourite Plum foundations card. So here it is and I hope you like it.


Lots of sparkle and prettiness on this one.

So here we go on how I put it together.


 I started with this Joy to the world insert die, It does not have a cutting edge around it so I thought Id use it for the focus with some sparkle peeping through.


 I took some Milk card and added some double sided adhesive and sprinkled on some diamond sprinkles and burnished it in to the sticky paper which I had cut to size slightly larger than the die cut out plum card.


 I adhered the die cut to the top and gave the sparkle piece a plum layer to sit on too. Again I wish cameras picked up the crazy sparkle but they never seem too.


So then I took a piece of paper from last months blossom pad , which had a very small and fine pattern but in the same plum tone and used that as another mat and plum card again for its matching layer. So we have the basics of this very simple card already put together so now to make it prettier with some aesthetics haha..


 I added a piece of Gold crinkle  ribbon to the top right and bottom left here anquored underneath simply with a piece of double sided tape.


 I tied a double bow from the same ribbon , adding it to the bottom left area where I just strapped the ribbon to it. I used a small pearl embellishment for its knot coverage.


The top right I used a Creative Expressions embellishment white flower to add to the centre of the bow and I had some pearl swirls so I used them to vine out from under the flower instead of using leaves this time. I also gave it a soft gold mat and raised it u on foam and added another layer of gold to finish the backing off.


 I added some more pearl swirls under the bow and some 8mm pearls to the top left and bottom right corner and the rest were a few 5mm pearls on the design to enhance the swirls in the design.


 Here is a close up on the central Die piece so you can see Sue's Joy to the world die and also the sparkle shining through and all the added pearls on the design swirls in the central piece.


Here is the completed card again.

The die and sparkles I used are


 Joy to the world from Sue's festive collection.


Glacier Ice from Cosmic shimmer for Creative Expressions with the self adhesive sticky sheets.

Here you can just see that sparkle hey...

Ok my lovelies thank you for all your kind comments on yesterday's card as always and I will see you all very soon with lots of goodies and news.

Huge Hugs

Kim 
XXXX


Tuesday, 3 November 2015

Visible Image Tuesday.. Yayyyyyy.

Hi Folks

Well as promised Visible Image tutorials have now moved to Tuesday and I thought I'd start with the step by step for my recent pink card that was done in aid of The Big Pink week for Breast Cancer awareness.
I am sorry it is a bit late coming.
This weekend was certainly a sad one , it would have been my husbands 60th birthday Saturday so we were all a little sad he wasn't with us to celebrate his special day on Halloween but I know he is always with us.
I hope everyone is well and that you all enjoy looking through this vision of pink using the very special Visible Image stamps.

To refresh on the Pink card here it is.


And here is the full step by step.


 To start I took a rectangle piece of white card and used some picked raspberry and spun sugar distress inks to blend it all out to this fade in the above picture. I then used raisin adirondack ink and the script stamp from The Revolution set and stamped off the page in a random pattern. But leaving the top right and bottom left corner fairly clear.
 

 Next I tore the paper toward me on those two corners that i left blank to expose the inside core . I used some of that raisin ink to rub those edges and also some Walnut stain Distress ink to darken them a little further. Set aside to dry.

 I took a larger piece of white Card and glued the pink hessian I had in my stash to it to the left hand side.

 I added foam to my first piece and added it to the second with some wet glue to stick on the Hessian really well.

Then I gave it a black mat to sit on which instantly makes the darker ink stand out.


 I used some dripped glue with some Frantage embossing powders and glitter to add some interest to the the top right of the card as I knew I was going to attach something above this.


 I stamped this lovely sentiment out and tore the edges inking the same way as the last piece with raisin and a little Walnut stain. Raising it up on to foam and adding it on a jaunty angle to the card front.


 Next I took a plain white resin piece, which was a side on butterfly or moth one or the other and added some pink to it with a Promarker and the added glued and cover in glitters. This I glued above the embossing we did and to the to right of the sentiment.

Here is a close up.
 All that was left from here was to add a little breast cancer symbol in ribbon topped with a pearl and I tied a bow using some of the hessian taken from the edges of another piece and added a sparkler to the knot and Voila... complete.


Here is the finished item again.

The stamps I used were .


 The best days.


Revolution.


I hope you enjoyed this one and you can see what you can do with just a couple of fabulous stamps and some hessian and glitter too.

Thanks for stopping by as always 

Lots of love

Kim 
XXXX