Showing posts with label butterfly. Show all posts

Thursday, 9 April 2015

Creative Expressions Thursday

Hi Folks

Happy Thursday, I am so glad this is a short week aren't you?
Although the sunshine is soooo good to see especially as I left work at 6pm... and the sun was still beautiful yesterday.
I wanted to pose a question to all my lovelies, when you are all looking at the blogs do you prefer to see lots of step by steps in photos or do you prefer a quick description of how a card was made?
I guess I was wondering if you find it helpful all the step by step pictures or if its overkill as it were and you may be thinking we don't want so many snaps, if you could let me know I would be very grateful folks.
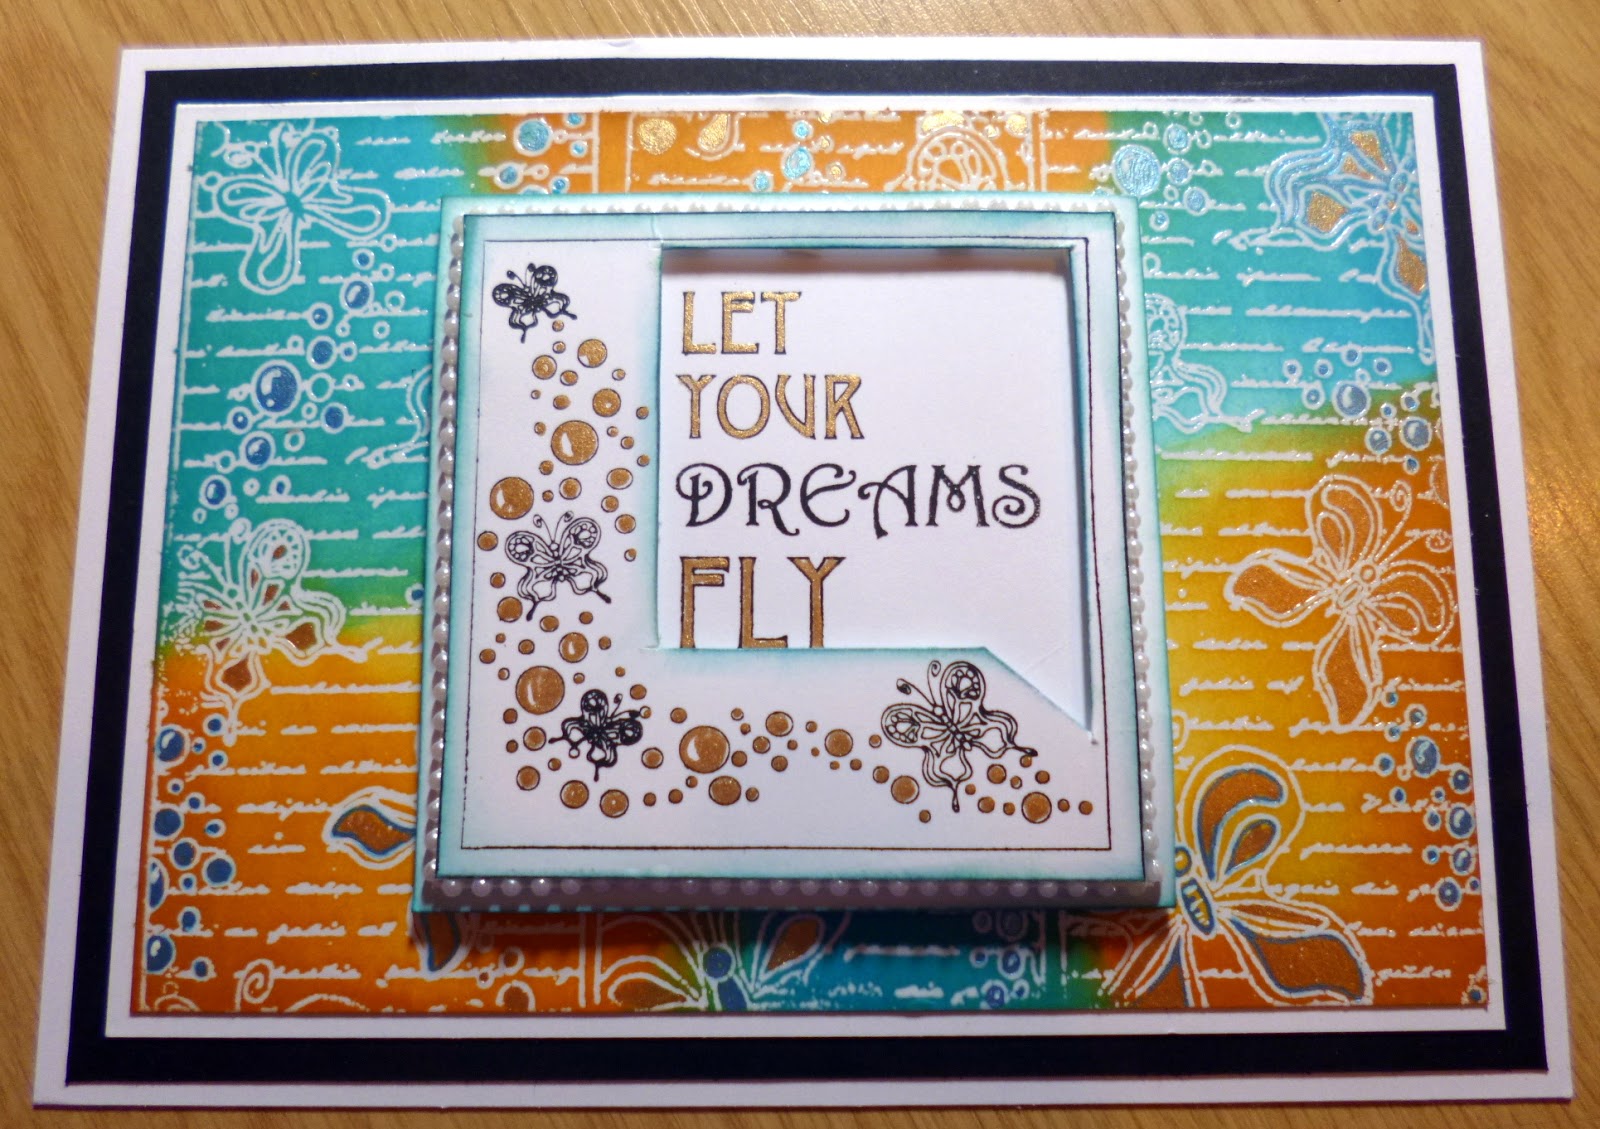
So today is of course Creative Expressions day and I have been using some lovely spring colours to match the stamps for this month.
I really love this colour combo and the richness of the oranges, Orange used to be a colour I reached for last in my collection as I used to have a real adversity to it but this last year I have really started to enjoy it, Isn't it funny how our tastes change after years of not liking something.

So here is the little creation for today , see what you think?


I have combined clean and simple with the focal point with a really inky background for a bit of fun this week. This is how I made it.


 These are the coloured inks I used for this one. Wild honey,Rusty hinge and Salty Ocean.


 I took a piece of white card stock, The Butterfly dreams Striplet from the Stamps to die for range from John Lockwood and stamped it three times, in a row but hanging it off the edge of the card as I was avoiding getting the border in,  I also used Perfect medium and some clear embossing powder and heat set it just so it will resist the inks above wen we colour the background.


I coloured the background in my usual way , I love layering the inks too, so I begin with getting the first coat on the card which is always patchy with a few marks and edges in because your aim is to get the card damp at this stage so we can blend the inks so do not over think this layer , It will look messy but it will come together folks.
add the next layer of ink which starts to smooth the colours , then go back with the deeper colours or the same ink and deepen the edges to give depth and a nice graduated blend on the edges as you see above.


 Once colouring is dry decide what colour mat and layering you will do and add them to the backing too.


At this stage I used a little gold and blue paint for the inside of the little circles and also a white highlight on the larger ones  I think they look a bit like bubbles but that's just my interpretation. I then set this piece aside to work on the centre piece.


 I stamped out the Butterfly dreams square image from the Elements set also called Butterfly dreams by John. and coloured the bubbles to match the backing but I left the butterflies white. I cut out part of the frame as you see above , I placed it onto another piece of white card and positioned where my frame would fit the card and stamped the words through the frame. I then painted in the letters in gold.I also added a tiny bit of the blue to edge both pieces of card.


 Once dry I added the frame to the sentiment piece with foam in between, and added it to the back ground piece too. I thought it needed a little something as I knew I wasn't adding bows or other elements as I didn't want to cover all our ink work. I decided on some white pearl strings from the CE range and glued a little strip around the edges of the central piece. Bit fiddly but so worth it use tweezers if your fingers are getting in the way here . Pre measure and cut your strings , it does make life easier then trying to cut then while the glue is tacky.

This is what it looks like at this stage.


Here is another angle so you can see the image better. 

I decided it still needed something so I took the butterfly Image from the set and stamped it in black archival 6 times to make three double layered butterflies.


I coloured the little piece of card with matching inks in random patterns  well splodges really just so each butterfly had a small mix of colours. I then set to cutting them our by hand and I didn't do it super neat, once cut we don't want white edges so I took a piece of cut and dry foam and inked the edges to match and added a little Glue to the centre of the bottom layer and pinched up the wings on the second layer before adding to the lower one, as below.


 I added just a little twinkle to each but didn't go over board with it as I wanted your eyes to see the background not just sparkly butterflies. I glued in a small piece of the pearl string to each one for the body. I then added them on the card.


I took some glossy accents and added a small drip to each of the little circles on the card to give it a raised droplet kind of effect , once dry they did drop a little but still looked lovely and very textures to almost make you want to run your fingers over the pattern.

So that completed the card and here is the main image again.


once last image shows you from side on how the bubbles are raised etc. 


If you didn't want to add the glue to the centre of the bubbles you could use your pearly glues like our Julia does on her cards or you could used some little pearls in different sizes with the same effect but more of an opaque silhouette rather than clear as I chose , I wanted the colour of the paint below to come through like a bubble I guess.

Okay lovely Internet friends I hope you liked this one and I will see you very soon, don't forget to let me know if all the pictures are more helpful than a worded description or if you would like to see both or how you would prefer it, I consider this our blog not just mine and what you prefer to see is not only helpful to me but Its nice for you all to have an input too. I like having the photos for my reference anyway but its whether they are helpful more than anything to you guys.

Ok have a lovely sunny Thursday.

Love to all.
Hugs

Kim 
XXXX

Saturday, 1 March 2014

New challenge on Visible Image.

Hi My lovelies

I want to say a huge thank you for all those amazing well wishes yesterday, I am so happy you are all here with me and I feel so very supported , we have some busy months ahead of us and I am so very glad I have all my crafting blog friends here with me along the journey . Bless you all.

As you know from previous months the first day of the new month is the start of the new Visible Image challenge and this month of March's theme is Your favourite Visible Image stamp. Well that sounds simple doesn't it but I love sooooo many it is so hard to choose, so I chose one of the very newest ones designed by Mark and the verse hand written by our own super talented writer Helen, what a power couple they are together. Plus they are such good friends too.

The winner at the end of the month of course wins £20 to spend on any Visible Image stamps they choose from the website. The rules are very simple too, just no digi stamps and use at least one of the Visible Image stamps especially with this months theme to use your favourite. So what are YOU waiting for. Pop over to the Visible Image blog and check it all out.

So here is my Fav and my inspiration piece for March.

Thinking of You .

 Here is a close up of Helen's gorgeous words and I think they are just perfect. I used True white embossing powder on Periwinkle card for the verse.
 Closer on the main piece which was achieved by stamping the head of the flower onto milk card with versamark and clear embossing powder. The same for the Thinking of you words on the bottom of this piece. I then used Adirondack inks to create the background remember to rub the ink off the resisted areas then I  covered it once dry with a double sided adhesive sheet , cut it out and  sprinkled fine Glitter all over and burnished it into the card. I then went back over the edges with corresponding inks in same colours on top of the glitter to darken it and add in more flower stems.

Here are the colours I used.


I created two Visible image butter flies and coloured it with a Sakura metallic Gelly roll glitter pen as below and covered this in double sided adhesive too, tipping on micro beads and adding a bit more gel pen to some of the beads and added some grooves in the pattern too, I used small flat back pearls for the body and added them to opposite corners.

 Sakura Gelly roll in metallic.

 I used simple garden string to wrap around the mid section of the card and tie the bow much like the latest trends with twine bows but I wanted it to be more rustic along with the corrugated card.

Here are the embossing powders I used , clear for the resist under the inks and True white for the Periwinkle card and for the brown tag piece on the front of the card.
In this picture not only can you see the string bow which I added some glue and some glitter and gold gilding wax to,  the button I also covered in Gold treasure gold but you can see all the mats and layers some raised on 3mm foam some on 1mm foam and some simply mat and layered with cosmic shimmer glue. The bottom layers are in Kraft card and one has been pierced using a piercing ruler and a 1mm pokey tool.


The Gorgeous Visible Image stamps used this time are.
 

                                   Large butterfly                                      Thinking of you set.

Can you believe I just used the two stamps sets for this lovely sparkly card, even I had to double check myself lol when I had finished as It isn't like me to use just a couple.

Well I hope you enjoyed today's post and I hope you will remember to check tomorrow for another Visible Image card for my Design team day card.

Don't forget lovely ladies if I have done a card or item that inspires something you have then created snap a picture and send it to me at my usual address if you would like to have me post it on here for you to be proud of and I truly love to do that for you in my new Inspired by section.
Email them to  kim.robertson70@googlemail.com  or if you have any questions or general comments or even if your need an ear I will always get back to you as soon as I can and I am always happy to hear from you all.

Have a great Saturday and as always leave me your comments and let me know what you think.

Huge Hugs.

Kimmy

xxxx

Friday, 7 February 2014

Happy Friday

Good Morning my crafting friends.

I Hope you have had a good week but please enough rain already... wow I'm starting to think I may sprout webbed feet and paddle everywhere haha.

I have a card again from the last show to put up on the blog and hope you all love it as much as I do.

 Here you can see I used the crackle mask to emboss into my milk card then coloured the background my usual way with my distress inks. rusty hinge and peeled paint. I then laid over the Bird on a wire mask and lightly blended a little more of the inks over the tops so you can see the birds in the background.I wrapped some of the champagne crinkle edge ribbon around the card and tied a bow with it too.
 The sentiment is from the Black eye Susan Just Rite stamp set which is stunning to work with.Which you all saw on the show with me and I use the sentiments a lot as they are so stunning. I also used two of those gorgeous metal corners for the top of the card which gives a lovely frame. I also matted tat first piece onto some black card then raised it on foam onto another mat and layer of milk then black card.
The main image here of course was from the butterfly multibuy I brought onto the show and here you can see very closely the colouring in matching and contrasting tones which I just love.

I hope you will all tune into our lovely Sue Wilson's blog today to see the answer to what was in the boxes from yesterday if you haven't found out on the creative expressions blog. I think she is making her reveal mid morning at Particraft.  And we all wish her an amazing amount of luck and success of course.
I am looking forward to getting out to a crafty atmosphere and seeing Craftwork cards and our lovely Julie and Sue on their stand but also to seeing my lovely friend Tracey for a cuppa and a chat too.

Have a great day ladies 

Kim 
xxxx

Monday, 19 August 2013

Craftwork Cards DT day

Hi all my lovely crafters.

It is my turn to post to Craftwork cards blog today and I have created a card and box using flowers hand cut and rolled just to show it is possible without a Die cutting machine ( I definitely would not be without mine but it is possible if you are on a budget).

I have used Craftwork Cards Bohemian Collection still available to Purchase or you can now download and print until your hearts content too. How modern haha.
 I would like to be great at photography so I can really show case the sparkle in the paper and how pretty it all is but I am afraid my late hubby was the man for that job. I just Create Art .
 This is a Anna Griffin butterfly already layered all I did was to glitter and bling him up. Pimped up my butterfly should I say  haha (probably not but I did ).
 The bow is from the new paper die-cut bow pads that are doing amazingly well, I added lots of rows of Chantilly Olive candi to the top.

Of course the inside needs to match as its important for a stunning card to have a fabby inside too.

I also made a box so here it is.

 Hand cut flowers some from unglittered paper some with glitter. I chose a vintage style lace for the bow and pearl rows for around the edge of the box instead of ribbon.
 Crushed up turned Candi with small bling stones inside add a little interest around the flowers.
 You can see that gorgeous glittered paper here.
And all the strung pearls too.

So I hope you are enjoying the blog today. I will be posting more frequently from now on so My day for Heartfelt Creations to coinside with their blog is Wednesday. For Craftwork Cards It is today and the 26th August and for my new team Visible Image I will be posting for them every Sunday. I also will be adding more projects to go forward to Making cards magazine so come on back and look around and be sure to leave me a comment as I always answer and is always exciting to see what other crafter's think too.
Lastly I want to say a huge welcome to my new folks joining the blog and to remind everyone that when I hit my first 100 followers I will do a little competition so I look forward to getting there.

Have a great Monday 
Love 

Kim 
xxxx

Friday, 19 October 2012

Happy Anniversary..

Evening Guys!

Tonight I am sharing with you all a card I made for my friend Keithy's mum whose been with her hubby Nigel for 25 years and they were celebrating their Silver Wedding Anniversary. So Congratulations to them and a big thanks to Nigel for photographing it for me as he is a photographer so therefore I have a proper photo taken and didn't he do a good job, my work looks fab and so nice to see good shots of it. The lilac on the card was the same colour they had had their wedding all them years ago and Keithy asked me to make it with a stiletto of some kind on it as Mum still had the one they chose to have on the cake and I found I had this one in a kit I had from Hunkydory I believe so I was lucky I had it to match for them. So thanks again and thanks to Keith for setting up the picture session.
I made it also with Chloe stamps and sat and embossed and cut out every flower and added them all separately, I loved making it.
Have a great Friday
love
Kim x


Thursday, 18 October 2012

Kanban prettiness..

Good Evening All.
Hope you all had a good day. I had a nice dinner out today with my daughter, very nice.
I made a lovely little number which I hope you all like after getting home.
  • I took an 8x8 card and covered it with a tiny border with one of the gorgeous papers from Kanban's vintage pad. Then I embossed another tonal piece with an m-bossibilities A4 embossing folder from spellbinders. I mounted it on foam and wrapped my ribbon around it.

  • I love the colours in this Kanban topper so next I mounted the outside frame of the topper on foam and the middle part I put on sightly higher foam, tucking in a swirl just under the edge before moving on to the flower which was cut out of the left over paper which I embossed earlier.
  • So I cut out some swirls and a flower an rolled it up , inked the petals in two colours.Added some tiny pearls an some sakura stardust pen to the swirls and edges of leaves/petals.I also rolled up a thin piece of the paper and squeezed it leaf shape and added it to the flower configuration.

  • After inking the edges of this beautiful sentiment I added it to the ribbon at the lower right of the card.
  •  I tied a smart bow out of this very wide ribbon and added a die cut leafy branch and a studio 490 resin flower which i inked slightly just to tone in with the theme of my card. You can also see in this picture that I inked the edge of the embossing under the bow which brings it all together and enhances the embossing nicely too.
  • I cut out 2 very tiny little butterflies and added them to balance the right hand side of the topper with tiny pearls down the body to finish off.
Well I hope you like Wednesday's card and think it is very pretty as I really do love showing you my creations and appreciate any comments and views.
Have a good night and take care.
Best wishes
Kim xx


Tuesday, 2 October 2012

Bohemian Prettiness

Good evening, all!
I've had some time off work so I have finished off my samples for the paper craft show over the weekend; I promised to post them off for Thursday. Here is another of the cards using Craftwork cards fab kit The Bohemian lace collection.

I was a little sneaky with this one and used the front packing page of the pad as I liked the pink wrap.
  • I matted the paper from the pad onto some sparkly paper and added it to my 8x8 card base. Then I cut out the wrap of the paper pad which had the pretty circle pattern which you can see above the flowers.
  • I then took one of the silver frames and inked it lightly with Milled lavender distress, I raised it up on foam pads but stuck it on top the pink circle then added a sentiment also inked in the mid of the circle.
  • Then decided to emboss the chain and key on the pattern in the paper to make it stand out. I took another page cut out the birdcage and embossed that too. I  shaped it and mounted it on 2 layers of foam just in the middle of the cage.
  • I cut out the butterfly shape and punched the pattern out of the wings, adding some bling along the body. I added some gold lattice net type stuff under the body too. 
  • Next, I made a few flowers and added some metal little keys on top of the ones on the paper and some metal leaves with the flowers.
  • Lastly I had a little card heart pressed from the middle of a birdcage in the kit and embossed it in pink and white, then added it to the top right of the card.
All in all a very pretty card from a pretty kit and I have loved using it.

Hope you all had a great day, it's been miserable and windy all evening so here's hoping for a sunny day tomorrow!
Kim xxx

Thursday, 20 September 2012

Flutterby Roses.

Good Morning All!

Here is a card made with a very recent kit I got from Kanban. I was playing around and found the lacy rose effect ribbon so I decided on an Easel card. Dawn Wheeler designed the kit and it is beautiful; she did a great job, such a romantic girly feel to it this one. So I had a play and went totally OTT with it, but some how it works.

I love the backing rose card matted on to black, the photo I'm afraid isn't great as it's silly o'clock and the lighting is pretty poor.

I have embossed butterflies with pearls on their backs, rafia ribbon and spiders web material tied up into bows too.

Simple and elegent but lots of elements that took a little while to secure. Tomorrow in the day light I will re-photo and hopefully that will be better!

Crafty hugs,
Kim