Showing posts with label pink. Show all posts

Saturday, 2 February 2013

Sweet Pea Goodness.


http://craftworkcards.blogspot.co.uk/

Hello Everyone.

You may have seen my Christmas cards here on the blog but It's now time for me to take up my role as Design Team new girl for Craftwork cards and share some little cards I made using the Sweet Pea paper packs which are simply stunning and can be purchased over on  http://www.craftworkcards.co.uk/default.aspx 
I absolutely fell in love with the blue tone pad but this one is stunning too. 
If you look in the background you can see some gorgeous paisley embossed cardstock which also happens to be CWC. It came with my Recipe cards, of course you will see some cheeky little Candi in here too.

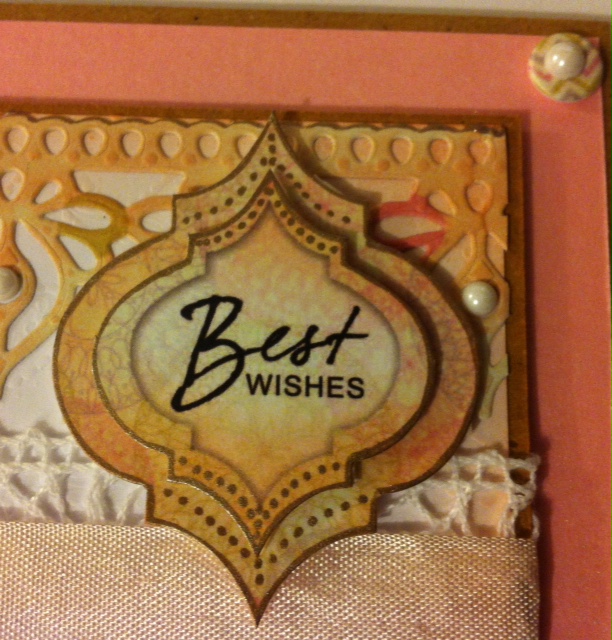
Some close up pictures to show off the layers of Paisley, Candi and Sweet Pea papers.
Why not have a look at the gorgeous Sweet delights goody bag here http://www.craftworkcards.co.uk/products/2784/sweet-delights-goodybag.html
They truly are sweet and yummy without the sins haha..
Here's my sentiment also from the pad ,I added some gold pen in dots, I thought it would look really pretty as if it wasn't pretty enough.
Lastly of course the inside just has to match and here I think you can see the paisley really well.
Now my little Vintage Sweet pea card.  The DT girls had a sneaky peaky on facebook this week. I love this card ,it just flowed so it was clearly meant to be. Do you love it too?
I would welcome your comments below and of course there are lots of gorgeous bargains in the sale section on the website so go have a look and snaggle  (hmm not sure that is a word but you no, I like it so I'm having it.. snaggle snaggle snaggle .. yup just rolls off haha)
http://www.craftworkcards.co.uk/products/by-category/2/105/clearance.html

I had this card on my blog this week and couldn't wait to share it with you all. The colours in the papers are simply stunning and go so well with all the Distress  Ink shades too and as soon as I opened the pad those colours jumped out ready to have Cut and Dry slathered all over the ink and tickling the corners of Miss vintage here to give it a little extra depth.
Here is a little close up of the sentiment from the pad.


And my little butterfly and flower alighting on the seam binding bow.
Lastly of course as always the inside to finish.
Well I hope you enjoyed this my first time out with the lovely team and I want to thank them and Julie and everyone at CWC for having me and also all the lovely visitors to the blog, I hope you managed to get yourself some bargains I know I will be and I look forward to seeing you all for another post on Sunday 10th Feb and as this wasn't my Official day Big hugs to Emma for letting me stand in for her. Thanks also so much to Karen Hayselden who helped me get started today even though she says I sound south haha, Thats so funny. Bless you Karen.  Mwaaa

Crafty Hugs to all

Kim
xxx


Saturday, 29 September 2012

Pick of the Bunch

I was asked by the lovely Julie Hickey from Craftwork cards if I could make some cards for the great Northern paper craft Extravaganza coming up soon. She gave me a gorgeous pad of paper and frames and new candi so I could have some inspiration as I worked; it was all from the new bohemian range which is glittery goodness and very lovely... Tonight I sat and made two cards which turned out really well with lots of embossing, over stamping and inking/blending which I love.

I have broken it down into a few pics so you get to have a proper look at the embellishments which are in the paper pad which I have inked and curled and moulded, added Versamark and embossing powder, heated, then added mica powder and heated again which allows the mica to sink into the enamel and so becomes permanent, so no rubbing off with handling.

It took a fair while to complete, even though it looks simple because the glittered paper is so beautiful. Julie is also going to ask her friend Nikki up at Leeds to photograph these cards to add to the  craftwork cards blog which is great. Thanks again Julie, such a lovely lady!

  • I took an 8x8 card base and added some pink card, I used some American craft card in valentine colours. I trimmed my sheet of paper from the Bohemian pad and Layered it on to the pink mat. I punched a thin strip of paper and added to the left hand side.
  • I took one of the frames and added some colour to it and some spray glitter to give it a lift. Then I added some rock candy paint all over and dried with a heat tool til it was all cracked but sparkly. I decided it wasn't dark enough so I rubbed more ink into the cracks, I love the effect here! After adding the little sentiment on top of the frame here, this section was complete. I have to say in this picture (because the lighting is rubbish) the frame looks orange, but it is in fact pink and distressed a little.
  • I moved on to the tag next.
  • The tag came in my Bohemian goody bag I received from QVC the shopping channel, and it matches the free pad from Julie so i inked it with my Distress Inks and then covered it in Versamark and embossing powder and heated, I will never tire of the change as it transforms... I did the process again to make it really smooth and shiny. I added my ribbon through the tag also and a small piece of the thin punched loopy paper to add to the tag.
  • I popped out lots of flowers from the pad and curled them, inked them and to some I added bling, some candi, and some I curled some tiny swirls for the centre of flowers.
  • My insert was the same design paper without the glitter all over, so it could be written on. I took the piece of paper that the flowers were attached in and used it as a mask with my Pan pastels. I stamped the amazing Clarity stamps sentiment onto it. 
  • Lastly I had a skeleton leaf, not everyones fave but I added versamark and embossing powder to it, melted it in and did the Mica technique again. I added it to the upper right corner with a flower. Some of the flowers I used I also enamelled as you can see in the last pic. You can see just how much beautiful glitter is on this paper in this one too.
Well it is now gone 2 a.m... I'm sure my son is still partying from his birthday and rightly so! lol But I have to hit the sack as back to work in the morning.

Night bloggers, and I hope you like my card, If you go to the GNPE then I wonder if you will see my card there... Let me know! I have my very own stamp which Clarity stamps made and I love it, I have never had  Polymer stamps so good as Barbara Greys.
So look out for my stamp if you go to the Craftwork cards stand.. I really wish I was going, I truly would go to every show if I could, and be part of it all.  Big sigh lol.

Have a great weekend and look out also for lots of new posts.
Kim xxxx

Wednesday, 19 September 2012

Fly away with me/project space

Good Morning Bloggers!

Well I say good morning, but it depends where you are...
Anyway a sweet little 5x5 card is a quick offering... I finished off my 30 "thank you" cards and made a box wrapped in ribbon to go with them! Very pretty.

Anyway... How quick do we deviate from the original plot... I blame it on my age but it is probably more the craft brain running 100 projects at once, then new ones queuing at the door waiting to push the brain cells over for an inch of new project space... hmm

So my little card is made out of leftovers from the backing diamond mirri card, which I had used to make my bauball card too. The flowers were left from using a Chloe stamp and making some cards with it after stamping embossing and cutting out. I used different levels of foam pads to raise up the frame and topper in the centre. Bling in the flower centres.
A little way to use up some of the huge leftover stash we all collect.

Exciting news for me... News of more exposure and a little more publication of my cards coming soon
It makes me so proud to see anything that I make published and to see my name written in print, and I will never tire of that moment when someone thinks your work is nice enough to be included in their company's flyers or magazine, I really want to be able to do this as a full time job, and won't give up trying to get to that stage! And we all never stop learning and growing so I'm thankful to all the people who have enjoyed my work so far and have asked to publish it and all the special people who support me, especially my editor-in-chief Son Andrew and My clonie Daughter (she knows)  Mandy and my late husband who was always my biggest supporter and would be patting me on the back for every tiny step.

Have a great Wednesday already half way through another long week...
Kim
x

Wednesday, 12 September 2012

My best friend..

Evening Crafty people.

How was your Tuesday? Good, I hope. I still have a snotty nose but the cold is starting to go. Yay.

I received news that some cards I designed for Stamp Addicts are going on Create and Craft TV on Thursday! The show times are at 4pm and 6pm, so I'm looking forward to seeing them on TV! Of course, I have photographed them, and I will upload them here after the shows, as I don't want to spoil their new stamp reveals!

Anyway, of course, I have a little offering for today and so here goes, hope you like it.

A cutie for today. This is a Crafters companion Swalk range stamp.

I think the image is really sweet and the words very true... I actually just stamped out the image to have a play with my Sakura pens, which I brushed out with a water brush and I quite like the effect.

Not too keen on the psychadelic pink of the dress but it can be changed, even some paper piecing would be fun if I couldn't cover it with colour.
  • I started by colouring the image on some really good stamping card. I always recommend Centura pearl turned over, although I recently discovered Stamp Away stamping card which is very reasonable and holds the image well too.
  • Next I matted the white card onto some black. I added some little jewels in the corners for balance.
  • I chose my backing paper from yet another free pack, this time out of a mag, and matted that onto black also.
  • I had a ribbon in my stash that matched nicely and wrapped that around my backing paper mat.
  • I layered them up and tied a pretty bow for the corner, I dressed the bow with a nice big jewel and added small ones at the corners of the card.
  • Lastly, I had a craftwork cards flower which I added a bit of sparkle to and placed it at the front for dimension. It was actually a raspberry sort of colour in pearlised card, but it came out quite dark in the pic.
So, a sweet card but I love the way I managed to get the hair to shine and nice rosey cheeks too and I did not use anything but Sakura pens and water. I love alcohol pens and Distress inks, water colours and other mediums, but I wanted to show how it can all be very simple too.

Have a good wednesday and I will meet you back here tomorrow, don't forget Create and Craft Thursday 4&6.
Kim x

Wednesday, 5 September 2012

Pink Roses

Hi all.
Hope everyone is having a good start to their week. Wednesday has just started with it being 12.53a.m here. Before I go off to sleep I thought I would add a little card here for you all to view. I really would be very happy to read your comments if anyone would like to do so. I also will be sending out a card to the first person who does leave a little comment as previously mentioned, that person will also get a shout out on my blog and other social media sites.

Now to the pretty card, as you can see it was a quick creation though very pretty.

  • I started with a Kraft card base 8x8, stamped a sentiment inside and my logo on the back.
  • I took my pink vintage paper and inked edges and corners with Tim's Tattered Rose and a little Victorian Velvet. I do this for two reasons, the first to blend the edges to give it a much softer look so the focus changes as you view the card. Secondly, this way you don't have stark white edges therefore a more professional finish. I added a ribbon and a sentiment wrap from craftwork cards and attached the whole thing to the card base.
  • I took a core candi mat form Kanban and instead of ripping the edges to expose the coloured core in the card, I put some thick foam on to the back right against the edge and added some glue around its edges.
  • I then folded back the scored pieces as I said instead of ripping them off, this makes a little platform raised up for a topper or flowers or anything really, In this case though I'm using a Kanban rose topper, which is stunning and speaks for itself, needing hardly any embellishment.
  • I added the topper and a bow and also two coloured pins in the top of the topper but pushed into the foam under the platform. I was happy with its simplicity, it's an elegant card.

Have a great Wednesday guys and come back tonight for a new post featuring a dartboard, a number and a bottle of champagne. It was a fun and different commission with lots of elements.
Kim x

Thursday, 30 August 2012

Shades of pink.

Afternoon to all visiting! I had a burst of inspiration last night and this pink number was the 
result. 

I started Inking with Tattered Rose and Victorian velvet then a little Black soot Distress inks on some beautiful Craftwork cards, vintage paper. I have a pad of theses papers and they are almost card they are such good quality! Not sure what the gsm is, but they are very thick. 

I then stamped some swirls with tattered rose just for a little tone on tone dimension.
After that I stamped more swirls but in versamark, but any embossing ink will work. 

Then get your embossing power out, I used gold Debbie Moore powder but you can use any that you have and distribute randomly; they look better when they aren't uniform.

I did exactly the same on some flowers That came in the vintage pack with the paper.  I cut them out and curled them along with faux buttons.

Kanban do this fabulous thing, which they call spiders web. It comes in several colours but you can see it poking out from under the right hand flower along with some gold webby stuff (lack of words for this)! 

I did a fair amount of matting and layering with this card, remembering to ink along the way to match and pull everything together. I added lots of small black gems in the swirls on the right and few other places, A bow in the centre with a faux button and I used a punch to punch out some matching lattice shapes, inked them and layered it under the sentiment and under the flowers.

The only other thing to say is, I used a Kraft card for the base which is 8x8. It's recycled card and just the right colour and weight at 300gsm to stand up with all that it has sitting on it, you don't want it to buckle on the shelf and fall over. Alway use good quality base card; there are so many with high gsm now. If you got all way through that.... Well done! Haha!