
Welcome back to my blog this post will be on the tags that I created and made several of at the make and take sessions during Aly aly weekend with Visible Image. I had a Christmas one and a UTEE one throughout both the days.
We had a great time both the days and everyone seemed to enjoy themselves and went away with a tag they had created them self with several techniques , many of the ladies and gents had never even touched a stamp or inks before and were very happily surprised at how special their tags looked and totally individual at the end of the session.
We were completely fully booked by around 10.30-11 for the Saturday sessions and just had a few places left on Sunday but we did tweak the little 6 seat table into 7 and 8 sometimes to accommodate where we could through both days but still had several people asking throughout the day for spaces so that tells me you were all very interested in the gorgeous stamps and techniques we had used on these tags.
Thank you to those of you that came or wanted to join in and for all the lovely kind words you were all saying to me , I do take those words to heart and appreciate every one taking the time to want to speak with me and Mark and Helen, the dynamic duo haha.... I call them this because Visible Image is Mark and Helen, no huge team , no one helping, just Mark and Helen, they create , make , pack , print and label every single stamp by hand , every single deeply etched amazing stamp done by their own fair hands. Going to the show and seeing the work involved building the stand loading the stand arranging the stand and all the goodies , again all them. I am in awe... my hat is firmly off to them, yet the stamps are so amazingly priced and you can do sooo much with them. I thought I would mention all this for those of you who didn't know
Anyway going on to the step by steps so you can again follow along to the make and take sessions at home in your leisure rather when we are under time constraints.
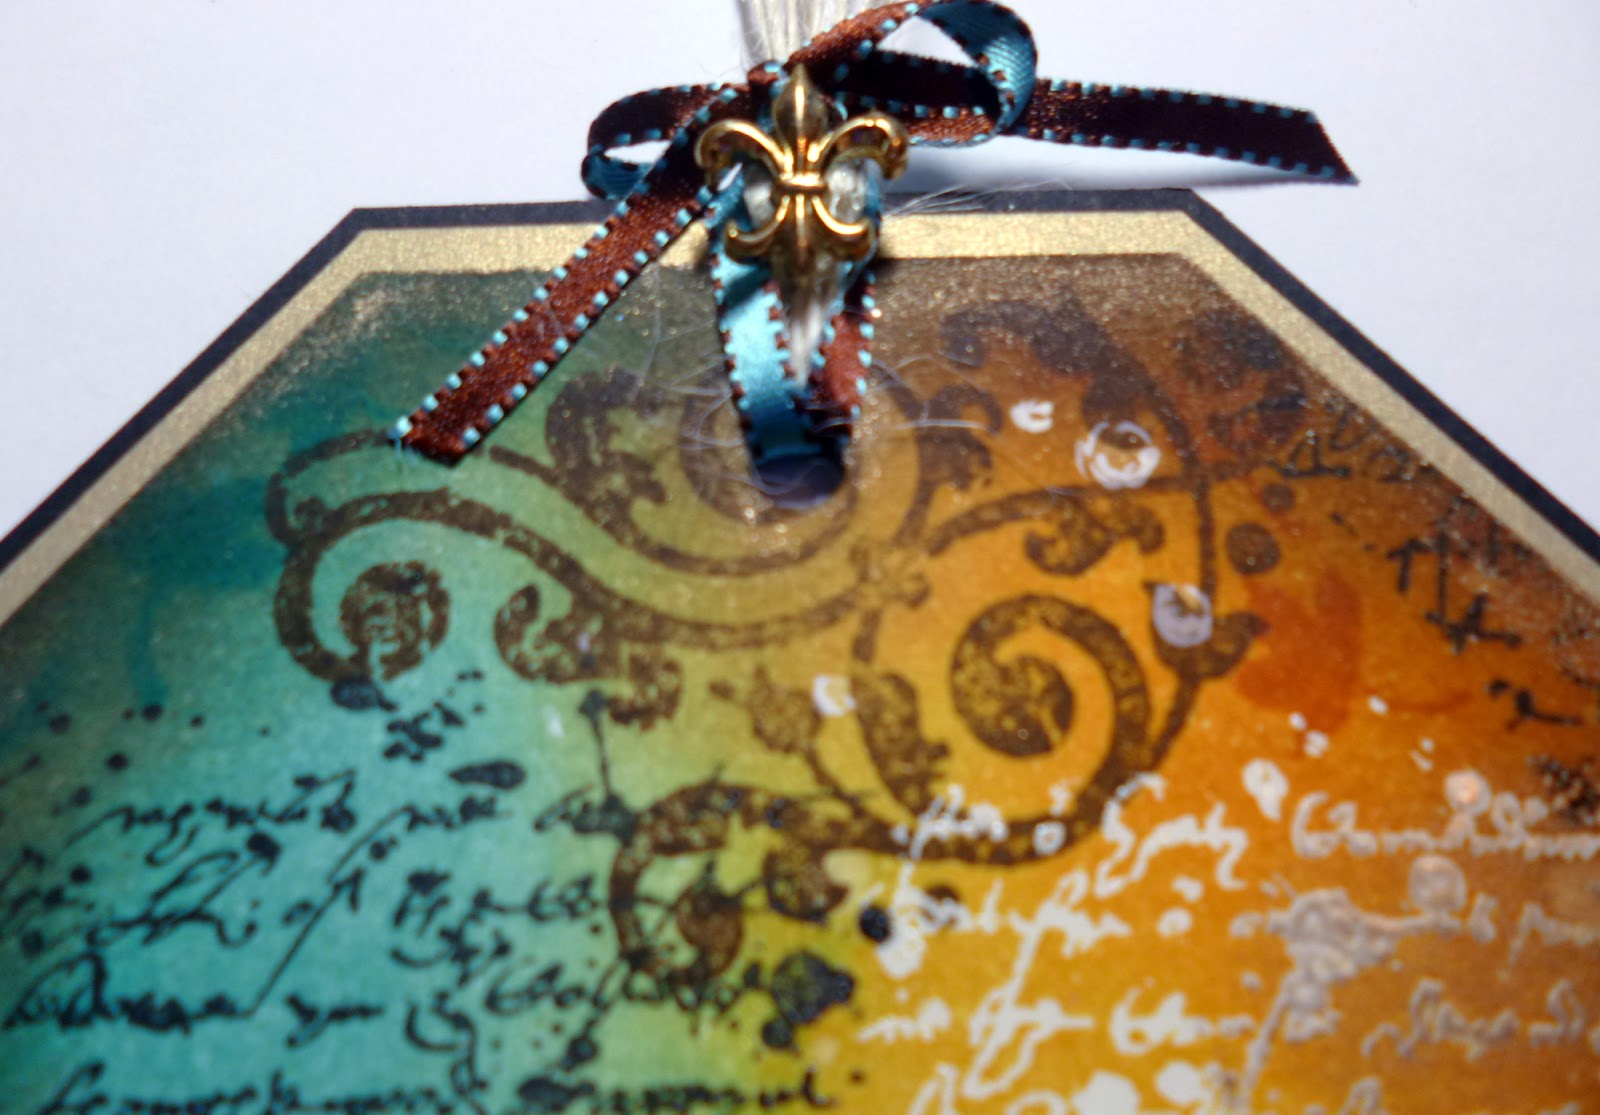
The first one is an autumnal tag which looked like this.

It was to show the layering of the background and how you can create them but also stamping in to Ultra Thick Embossing Enamel (UTEE).

Then rub over with an anti static pad this helps it to dry even further and stops the embossing powder sticking to the archival ink just done. Clean your stamp from using the archival with a wipe and using embossing ink , versamark or perfect medium etc stamp the same script or whatever you would like on the opposite side of the tag or where you would like it, we are avoiding the centre as we will be adding the utee to the centre. Add your embossing powder , I used clear as the tag here is white but you can use white if your tag is buff coloured etc. Heat set.

Once you have the first layer of ink on the tag (don't expect to much at this stage) go back and add a second layer of the same colour to deeply saturate the paper so it should look like the above at this stage.


To pull the eye more into the centre I added a darker in around the edges at this stage. I didn't do this bit at the show just purely as we were in a real tight time crunch as the utee part is the longest section of the make and take. Lastly here I sprayed some water into my hand and flicked it onto the tag, I Left it until the ink starts to dissolve (it looks like a ring starts to appear around the edge) once it does that blot off the water with a paper towel, blot don't rub. I used the dark ink also to stamp a swirl across the hole in the tag and a coupe of other places as another little layer on the backing.
You can see it here.
The Backing is now finished.
You can waft a heat gun over it to dry it but I just put it to one side now to dry while I do the utee section.

This is what we are looking to achieve next.
To keep this a little shorter I will explain how to in easy steps.
- Choose sentiment
- Cover that stamp in versamark/perfect medium and set aside ready.
- Take a small piece of card and add some Versamark/perfect medium straight to the card you can also use tombow glue if you prefer lots of bubbles. (make sure you have enough for your sentiment to fit it)
- Tip on UTEE , pour off excess onto paper and tip it back into the pot now before you switch on your heat gun. (pour off don't tap, we want to build thick layers.
- Heat this from BELOW. once it starts to melt you can heat above but if you do it at this stage you will blow it all over the table , house , furniture , cat , dog you get the drift haha...
- next if you take a long time putting the gun down and slurping ya tea etc and the utee cools right down you can add more versamark (don't do it while its molten folks or bye bye versamark) and the next layer of UTEE, If you are quick and you have heated the UTEE and it is still boiling hot tip on more UTEE as it will stick to itself. Melt again.
- Repeat the last stage a third time. ( three layers of utee)
- Have your stamp ready next to you and as soon as your 3rd layer of UTEE is molten and still wet add your stamp into it , push hard but don't skid it, so straight down onto the utee. once it is set into the utee take your hands off and sit back for a second. leave it alone to cool slightly. Don't go make the tea or walk the cat we don't want it cold we just need it to cool off a bit, A. you don't want to burn yourself and B. you need it to keep its shape when we remove the stamp.
- Ok its been a while so pick up the stamp block and pull the card away from it.
VOILA.... You did it.... Marvel at your cleverness. hehe
Rip the edges all around , crack the utee ( trust me it looks good. ) then rub a dark ink into the edges that are exposed, I favour walnut stain or vintage photo but if you use blues or your tag is really dark colours consider black, it looks fab.
OK add foam to the back and add it to your tag. choose some nice ribbon for the top and add some bling or a button to cover the knot if you choose or leave it rustic. I also Matted and layered my tag twice using card from my stash to make it nice and thick to last the rigours of the show.
The sets I used on this one were Revolution and Colours of the wind and the sentiment was Stay Strong which I love. I will show all the sets at the end of the post.
Next is our Christmas tag which looked like this.

So lets gets started.

I used a slight off white card so for this stage I embossed some snowflakes in clear, If your card is buff coloured like Manila tags then you can emboss in white if you prefer or keep it buff its entirely your choice.
So ink your snowflake with Versamark/Perfect medium and stamp off the edge of the tag tip on your choice of embossing powder and heat set.

Choose two colours of ink , I used here seedless preserves and peeled paint but it kinda looks like dusty Concorde in this light for pictures. you can use any colours you like together and at the show it was fantastic the colour schemes and different tags people were creating, I was soooo proud for everyone as they achieved what they thought they couldn't do. yeahhhh!!
So again, I colour corner corner side, I like how it comes out and it always works , I use the analogy of how flowers grow , they always seem to be off numbers and look better if you plant them the same in 3's or 5's etc, first layer of ink we are trying to get wet into dry so it will never look really cool with just one layer of ink but this is what it looks like with one (above) it will be patchy and may have some lines etc, do not worry about it just move on.

Next we add a second layer of the same inks, it will start to look much more saturated and more like the real colours and much more blended. Once this is done we will use the same snowflake tone on tone so green on green purple on purple or whatever colours you choose. I added just a few on edges here and there like branches almost as I knew I needed room on the left for my tree and sentiment.
I also spritzed some water in my fingers and flicked it at the tag waiting til it started to dissolve the ink as it is water based (its gets a ring around the edge as it starts to lift) take a piece of kitchen towel or a cloth and dab the water off, dab not rub. you will be left with patches of missing ink which gives us more texture to the background, If you were doing a water scene you could used these dots and turn them very simply into bubbles as I have done many times before on the blog but I will do again this week to show what I mean.

So this tag I made at home was very much bigger than the ones we used at the show again with time constraints of a make and take we had to downsize a little but here I took my tree as I showed on the blog last week used two or three greens ( used the colours you want on your tag) and I stamp out three slightly overlapping then I go on the next layer and overlap and layer them til I have a larger tree. which looks like above.


Now if you look at the tree I went back and added gold baubles which are just using a gold gel pen and drawing three circles slightly smaller in size randomly all over the tree, I know we are covering this in glitter so you think it will not show but it all adds to how it looks at the end, without this step the tree can look flat.


Next just above my tree I stamped in Versamark/Perfect Medium and embossed in gold the sentiment that goes with the little tree set, it says have yourself a merry little Christmas.
I took a quickie glue pen and dotted it al over the tree randomly , then tipped on some iridescent glitter. once this was done I took some glue , any that is thicker than the quickie glue that dries clear and laid down much bigger blobs of glue randomly all over the tree and tied on Glass glitter. Now glass gitter is the most sparkly shiny glitter ever but you do have to be careful as it will cut you after all it is glass shards. but treat it with respect and you can do some amazing things with it. so tip on your glass glitter and tip off the excess, admire the sparkle as it will be reflecting all the iridescent glitter underneath and all the work you have put in to building up to this bit.

I was testing out which bow I wanted at the top of the tag here but I ended up matting and layering this one to make it nice and sturdy for the show and then going back in with the ribbon at the top and the bow and then I found a nice button which I added too.

Which you can now see all finished on this tag. You cant see half the sparkle this tag has here as the folks who saw it in person with be able to tell you haha.
But for today these are the stamp sets I used on these two tags.


You can either use these stamps which are all linked as usual direct to the stamp on the Visible Image website or peruse through the stamps until you find something you would like to use on your tags , it isn't about using the same it is making tags individual to you and who you would like to give it too, the Christmas one can be added to a tree for example and themed to match.
I hope you enjoyed the process of making these tags and would like to give it a go, I was astounded at the quality and clever pieces made at the show as we were limited on time of course being make and takes not workshops but everyone managed to do brilliantly well. I really enjoyed meeting you all and all the hugs I will treasure meeting you and your kind words.
With that said I was a little surprised to see a couple of people had a few moans about not having enough time to follow along and needing more tables out, not wanting to share equipment etc but again that was only a very couple of people and I just wanted to pick up on the point I made up the top Mark and Helen do all this themselves there is no big company footing the bills they have to do everything and pay for everything and unlike most of the companies at the show we were not charging for the make and takes this time, they were free, all the equipment was either Helen and Marks or my own which I was passing around the group too, it is sad to see at our age some people still find it it hard to share but most people had a fabulous time and I could tell by their huge smiles at the end were pleased they could achieve so much.
Again a huge thank you to all who wanted to book and I apologise to those who could not book on but I will be doing a lot more so keep your eyes out and do ask your local stores to ask for demo days if you would like us to do that.
Visible Image has some amazing plans coming up and over the next year you will hear an awful lot about them and see lots of goodies. They have already got to the stage where they have their own office and are no longer making the stamps from home which is an amazing achievement and soon they will be moving forward with the next phases , I am sooo proud to call them my friends and to have been with them for so long.
Great things to come folks.....
Thank you to all who attended, a huge thank you to Mark and Helen for asking me to come along and looking after me with all the refreshments during the shows too.
See you all soon
Much Love
Kim
XXXX

Had a wonderful time learning from you Kim and went straight home to play with utee as it was the one truly captivating thing about the show... one play and I was addicted... and Visible Image stamps are such good quality and so diverse they truly are the best stamps for the job.
ReplyDeleteLoved every moment.. xx
2 message haha... I replied to the other one but thanks again for leaving me a comment i love seeing what you guys think and it inspires me with how I can move on and what to demo next for you al
Deletek XXX
Had a wonderful time learning from you Kim and went straight home to play with utee as it was the one truly captivating thing about the show... one play and I was addicted... and Visible Image stamps are such good quality and so diverse they truly are the best stamps for the job.
ReplyDeleteLoved every moment.. xx
Hi Erika. Welcome to my blog, thank you for all your kind words and for heping so many others at the table too. I am loving the card you produced since and I am so pleased you were inspired, keep going and I will add extras in on the blog that you can do to do with stamping into utee also... your ready Missy. lol Hugs Kim xxx
DeleteHi Kim thank you for the instructions. I am so sorry I got there too late for the Make and Takes. If you do it again I will try to get there sooner. Hugs Jackie
ReplyDeleteHi Jackie
DeleteOoo I am sorry you missed out too, I so wish I could have squeezed you in , Id be more than happy to have you with me. xxx
So glad it all went well and that everyone enjoyed their time there. Unfortunately there are always some who will never be satisfied but 'that's life' as they say. These tags are beautiful Kim and thank you for the detailed explanation of how to do them and will have to try something similar myself. x
ReplyDeleteHi Pat.
DeleteThank you for always being here with me, I really appreciate it, you are indeed right, you can lease everyone but I like to try lol
have a go for sure you can do it xxx
Hi Kim
ReplyDeleteWhat a wonderful time you all had at Ally Pally - just wished I could have been with you all, but alas not this time - but thank you for the above tutorial I shall be making these tags - as they are beautiful - as Pat said you can never satisfy everyone - but you know who your friends are dear
Hugs
Carol x
Ahhhh Carol thats lovely as always you say the loveliest things, thank you my dear and yes I definitely know who you all are. bless you xxxxx
DeleteWhat a lovely post Kim. Your designs are beautiful and no wonder the make and take was so popular. Thanks for sharing your detailed step by step. I am not surprised about the grumbles as sadly I see it too often out in the crafting world...some people are very selfish and needy. Helen and Mark work so hard and I too have used their stamps since their earliest days..they go from strength to strength. You are a huge asset to them...Team Awesome indeed. Way to go Visible Image. ......xxx
ReplyDeleteThank you Jane, I really appreciate you stopping by and taking a peep and leaving such kind words, Thanks so much
DeleteKim xxx
So glad you had a good time at Ally Pally Kim and just sorry I couldn't go too!
ReplyDeleteThanks for the long post and all the instructions , beautiful tags,
XxxRuth
Hi Ruth
DeleteI wish I could have met you too Ruth, your always so kind and lovely Of course it would be so good to see you in person and chat while playing with goodies of course.
Thank you for your comment as always
Hugs Kim xxx
Kim these tags are so beautiful, thank you so much for your patience and careful tutoring with us at the show, I have been inspired by your sessions to make some more tags, and even experimented with a UTEE style topper using some different powder. Thank you once again for your time and efforts to spread some crafty techniques with these awesome stamps xx
ReplyDeleteAhhh thank you Pauline for coming over, welcome to the blog and no thank you needed I genuinely love helping others to acheive things they think they cant, it was quite advanced and you all kept up beautifully as we were under time crunches etc. well done and just the fact so many of you have gone home and produced more things makes my heart happy. I am so pleased you now have another string to your bow. Kim xxx
Delete